Thursday, August 29, 2019

Moving Stuff

In the never ending quest to fit 10 lbs into a 5 lb box and needing to find a place for the new workbench MsBubba and I moved a few things around in the shop this morning.

The table saw was moved closer to the jointer and the French/English bench was moved next to the West wall where it can become a flat surface to store "stuff". The new Moravian bench is now where the old French/English bench was before it give up its place.


I expect sometime in the next few days I'll post a for sale notice for both the old French/English and the new Moravian bench. I need the room.

ken

Wednesday, August 28, 2019

Why Everyone Needs A Moravian Bench

The 99th reason everyone needs a Moravian bench. I assembled the portable Moravian bench in the back garden to help with final work on the new bench build. That need is finished so it is back to the bench's normal storage area.


As you can see apart it takes up maybe 4 square feet of floor space. Together or apart in less than 5 minutes and a "real" bench to work on where needed. Every homeowner should have one.

ken

Tuesday, August 27, 2019

BC Classic Vise Screw And 14" Crisscross


It is a short video showing spinning the vise open, placing a length of 1X in the jaw and spinning it closed. When it closes, without further motivation or touching the vise handle I edge plane the edge and the board does not move. Then I show how much more handle movement is available with little effort, plane again, then remove the board with again little effort on the vise handle to open the vise and give it a spin.

This is one sweet vise. It is a very easy install and is reasonably priced.  I will be replacing my wood screw with parallel guide vises on the other benches with the BC system.

Sunday, August 25, 2019

Can You Hear The Fat Lady?

She is hitting the high notes as I type.

There is some minor cleanup to do, pencil lines, glue squeeze out, and I need to add the "Crubber" to the vise chop so it holds better. It will be tough to get to hold any better than it does now but I will add it anyway. Once the final clean up is finished I'll put some Tung oil on the base but may leave the slab dry until the bench finds a home.

It should be a good bench, from what work I've done on it it is rock solid, the vise is a dream, and it is a good working size.


As always, click 'em to big 'em.

BTW, today has been a tough working day, I'm not sure what the temp is but it is high and the RH is even higher. It has been a work for 10, rest and drink water for 20 all day.

ken


Saturday, August 24, 2019

Bench Finished..Kinda

The workbench part of the build is finished. All that is left is making a tool tray.


Tomorrow my guess is I'll spend most of the day digging through the wood pile trying to find something 4/4 wide enough, long enough, and straight enough to make a tool tray. I really don't want to go to the wood store.

Right now for the tool tray, if I find an ok hunk of wood, I'm thinking a simple rebate with glue and cut nails, quick and dirty but with the nails it should look pretty good. If I end up using some Pine I'll have to think about it.

ken

Friday, August 23, 2019

Vise Mounted

There is still work to be done on the slab. The top finish still has a way to go and the ends need trimming to final length but my back and arms needed a break so I mounted the vise.

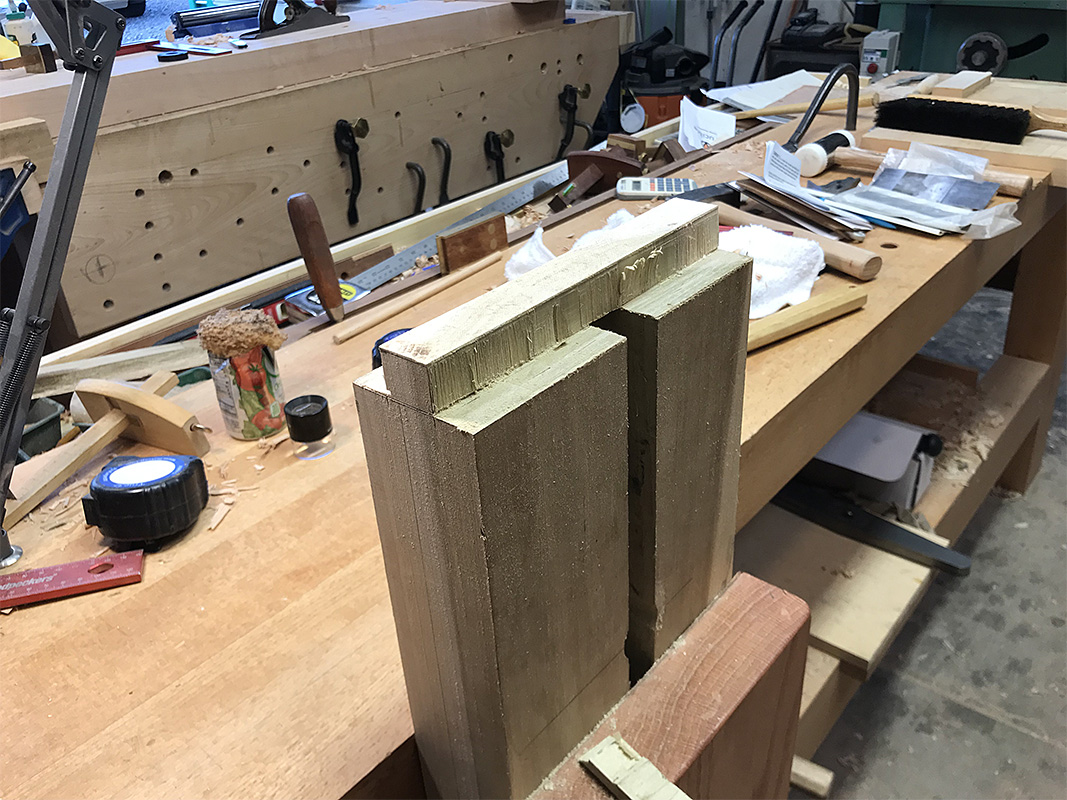
Oh boy is it sweet. It is slicker than snot. Where has it been all my life. I want it to have my children. Maybe a little overboard but damn it works a treat. A spin in either direction and it runs until it runs out of energy or into to something. Once it clamps on a piece of wood (and this is without leather or the cruber on either face) it holds. I planned the end grain of a board that was sticking up 150-200mm and it didn't move. See photo:


I'll see if I can make a video that will post.

The pin for the backer board crisscross needs trimming, I didn't want it to be too short. I'll do that job the next time the bench comes apart along with cleaning up the base units and rounding the long stretcher tenon ends.

Tool tray next, while the fat lady isn't singing, this sucker is a workbench.

The vise is so sweet I expect my main bench is in for a new vise. Probably soon. The BenchCrafted Classic vise with crisscross has a couple of things going for it. First of course is that it works really well, second it is slightly cheaper than the Lake Erie 2X wood screw kit, and third it is an easier build than the wood screw with a parallel guide.

ken

Cleaning Up The Slab

On to the scut work. Cleaning up the slab is not the most fun part of the build, I may get it close and then run the slab through the planer to finish. To be decided depending on how my arms and back hold up.

Some of the cross grain work has been done with the old reliable Stanley #5 with a "Jack" sharpened cutter. For the end to end work I'm using a Philly Plane single iron Razee Jack. Wood stock planes are lighter and do not require as much "waxing" of the sole vs. metal body planes. For this kind of work single iron vs. double iron makes no never mind.


I'm guessing MsBubba is cool with the portable bench being on the back patio. She has commandeered the far end of the bench for some of her ceramic work.  BTW, the bench is rock solid, not a wiggle with either heavy cross grain or end to end planning.

Have I ever mentioned that everyone needs a portable Moravian bench? 😇

ken

Wednesday, August 21, 2019

I Listened To Sylvain

The other day Sylvain asked why I didn't use the portable bench to work on the new slab instead of carrying it back and forth to the shop. I was busted and gave a weakass excuse of having no room. I was kinda correct but after thinking about it and looking around the area I figured, if I didn't leave it up too long MsBubba might not say too much. I could put the portable bench at a 90 to the new bench where I could slide the slab back and forth as needed. It messes up sitting at the patio bar but as hot as it is now (111F this afternoon) we are not using the bar very much and it should save my back.  Thanks Sylvain.


It goes to prove the old adage that it is much easier to build a bench if you have a bench.

The slab is setting correctly on the bases, the vise backer has been trimmed and the crisscross pin hole has been extended into the leg. The chop has been shaped and is ready to be mounted. Next up is cleaning up and flatting the top of the slab.

Even though the bench is almost finished there are still a number of remove the slab and fiddle with something then replace the slab cycles to go.  It will be good to have the bench to slide the slab onto.

ken

Tuesday, August 20, 2019

First Fitting Of The Slab

The first fitting is not bad, the backer board needs a bit of trimming, maybe a mm or two off where the angle meets the forward vertical and I expect after looking at the left forward peg and mortise I'll drill the mortise a couple or three turns deeper.


I'll piddle with the fitting a little then clean up and flatten the slab and trim the ends. After the slab clean up I'll round the ends of the long stretchers and mount the chop followed by making the tool tray.

Making a tool tray can be a PITA because it is so long but bottom line it is not structural and almost any joint is strong enough. The biggest problem is finding or making boards that are long enough and straight enough to use.

This sucker is almost finished, in fact if needed it could be used as a bench today.

Saturday, August 17, 2019

Slab Mortises Finished

The slab mortises are finished, I expect I'll do a little more clean up on the bottom before the bench is finished but the slab is ready to mate with the base.


The rectangular mortise is to house the top tenon on the vise backer board and the round mortises will house the base 5/8" dowels holding the slab in place.

One more mortise to chop on the long stretcher to house the bottom tenon on the vise backer board. Once that mortise is chopped the base will go back together, the vise will be fitted, and the slab installed. All that is left is the tool tray and clean up. The fat lady is clearing her throat.

ken

Blind Pegging The Slab

Before you can blind peg that sucker you gotta get the slab on the base. Another couple of feet longer I'm not sure I could do it without help.


Next up is deciding where to put the base mortises and then driving a finishing nail 10mm or so into the center to start the blind pegging.


Clip the nails to about 3mm, leave enough so they can be easily removed but short enough to just leave a marking hole in the slab.


Place the slab back into position on the base and press down to mark the mortise location. Remove the slab and drill the mortises. The back mortise will be elongated on the slab to allow wood movement. The next post will cover drilling the mortises and final install of the vise.


I guess I should add that the base mortises will hold 5/8" dowels that stick up ~25mm and the slab mortises slip over the dowels to hold the slab in place.

The next job will be taking the base apart to chop a mortise in the stretcher to hold the vise backer board. The slab will have to be moved back into the shop, my back hurts thinking about it, so I can chop the mortise for the top of the backer board. Once those are done the bench goes back together with the vise installed and the bench is finished other than clean up and making a tool tray.

ken


Wednesday, August 14, 2019

BenchCrafted Classic Vise With Crisscross

The vise is together and damn it is slick. Give the Johnson bar a push either left or right and the screw spins until it runs out of energy or the chop runs into something. Then give the bar a little encouragement and whatever is between the chop and the face is held rock solid. Pretty damn impressive.


I still have to shape and fit the backing board to the bench and shape the chop but the vise is made and it is onto installing the slab.

ken

Working On The Vise

The French cleat crisis is over. The hanging cabinet is back on the wall with a more secure French cleat. All the crap that did the bounce test (thanks Ralph) survived and is back in the cabinet and I'm back to working on the new bench.

The crisscross is installed and working as advertised. Next is installing the screw and nut. It is mostly fiddly work making sure everything lines up and nothing drags.


Once the nut and flange are screwed down and the action is free I'll take the vise and backer board apart and finish shaping each.

The next step is installing the slab followed by marking the positions of the upper and lower backer board mortises on the slab and long stretcher. The whole bench will have to come apart one more time to chop the mortises then back together with vise and backer board installed.

After installing the vise all that is left to do is making a tool tray. The fat lady is warming up backstage.

ken

Monday, August 12, 2019

French Cleat Failed

The screw holding the French Cleat to the wall stud failed and the cabinet fell.


It looks worse than I expect it is from my preliminary inspection. The drill press table is not damaged, just the base support turned. Best I can tell the stuff on the floor did not break nor were any of the chisels in the rack under the cabinet damaged.

The biggest problem will be getting the cabinet down from where it is without causing more damage. For now I'll wait for MsBubba to awake and have her morning tea before doing anything. Maybe between the two of us we can get that sucker out of there with minimum damage to person or stuff.

ken

Sunday, August 11, 2019

Splitting Out Stub Tenons

The vise backer board has a stub tenon on each end. The bottom one needs to be made first so the backer board will set on the long stretcher for marking the top tenon and angle of the leg.

One of the nice things about Poplar is it is easy to split and splitting the short wide tenon is a lot easier than sawing.


Next is installing the screw. To install the screw I need both a 2 5/8" and a 1 1/4" Forstner bit, the 1 1/4" is no problem. The 2 5/8" I had to order. It should be here tomorrow but until it arrives I'm dead in the water.

It may be a good thing, a nap and pool time is a good way to spend a hot Tucson afternoon.

ken

Saturday, August 10, 2019

Making The Vise

The crisscross is installed and works a treat.


The inter board is the vise backer and the outer board is the chop. I've marked where the vise screw hole needs to be drilled on the backer board. The vise needs to be disassembled to drill the screw hole and install the nut. The backer board also needs a top and bottom stub tenon cut along with cutting the left edge at an angle so the backer board fits against the base assembly.

After finishing the vise unit the slab needs to be installed on the base so the vise backer board mortises can be marked. After marking the mortises the whole thing needs to be taken apart to chop the vise backer board mortises. Once the mortises are chopped everything goes back together and the basic bench is finished.

I will make a tool tray for the bench and I expect a full length tool holder for the back edge of the slab.

The fat lady ain't singing but this ol' horse can smell the barn.

ken

Friday, August 09, 2019

Checking Bench Slab For Wind

The slab is out of the clamps and bottoms up on the French/English bench so I can clean up the contact areas of the slab and correct any wind.


Cleaned up the part of the slab that will set on the base and checked for wind.


It looks pretty good with no wind. I'll do a light clean up of the glue lines before attaching the slab to the base.

Next is finishing the vise. I finally settled on using the BenchCrafted Classic screw and 14" crisscross. The vise should go fairly quickly if the heat or MsBubba's line of sight do not get me.

Once the vise is mounted I'll make a quick and dirty tool tray and the fat lady can sing.  

Thursday, August 08, 2019

Bench Final Glue Up

Other than the tool tray, joining the two halves of the slab is the final glue up on this bench build.


Once that sucker is out of the clamps I'll clean up the bottom where it sets on the base and correct for any wind. I checked the base for wind yesterday and it is dead nuts true.

There will be a series of taking the slab on and off to mount the slab plus the vise assembly. I wish I looked more like Conan that Mr. Peepers.

The vise is also coming along. The chop came out the clamps this morning and I have completed the vise backer mortise. The vise still need the chop mortise and the holes for the screw drilled. Once those are done there will be several cycles of slab on and off to mount the vise. Bottom line this bench is close to the short rows.

ken

Monday, August 05, 2019

More Moravian Bench

Using the first set of two slats as a "backbone" I added two slats to each side giving a four slat set. The four slat set is half of the slab. Next is doing the same to the other two slat set and once that set is out of the clamps I'll join the two four slat sets to complete the slab.


When the slab comes out of glue up I'll clean up the bottom where it sets on the base unit and take care of any wind. I'll wait to clean up the top until the slab is installed.

While gluing up the slab I've started making the vise. First up is the vise backer board, here it is marked up:


As always, click'em to big'em.

The vertical parallel markings are for the crisscross groove, the circle is where the screw nut goes. The angled vertical marking is where the backer board fits to the front leg and the top and bottom horizontal markings are for the tenons that hold the vise backer board in place. 

Things are moving fairly quickly now, it will not be long before this pile of wood looks like a bench.

ken


Sunday, August 04, 2019

Slab Glue Up

Ralph asked for photos of the slab glue up. The slab will have eight slats glued up two slats at a time for the first four slats.


My current thinking because this being Beech and Beech loves stupid wood tricks is to use the first two sets of two slats as a "backbone" and glue two slats to the outside of each of the first two sets. Then the final glue up will be the two sets of four slats. BTW, for the first two sets the four Beech slats are straight, the last four slats not so much, not bad for Beech but they definitely have peyronie's disease. I'll mix and match so the curves offset.

The first two slat set out of the clamps:


Cleaning up the glue line:


So far this has been no drama, life is easy just working one or two glue surfaces at a time. The only problem it stretches out the glue up over several days.

ken

Friday, August 02, 2019

Slab Machined

Slab pieces machined and ready for glue up.


I need to make several sets of cauls for the glue up and go to the woodstore for a big bottle of glue before I start. The shop is getting hot so I may be finished for the day.

I think the vise dithering is over, my plan is to install the BC vise with crisscross on this bench. If I like it, then get another BC vise and crisscross for the shop bench. If not and someone wants to buy this bench I'll offer it with either a Lake Erie wood screw and parallel guide or the BC with crisscross.

ken

Thursday, August 01, 2019

Bench Base Together

The key mortises are finished, keys made, and everything fitted. It went together easily so now on the the slab and vise fitting.


The bench is in the back garden so I have room to work on it, currently the shop is full 😊. BTW, in the background is the first woodworking bench I made many years ago. I expect if it were needed I could hang a vise or two on it and it would still function.

ken