Tuesday, July 30, 2019

Fitting Keys

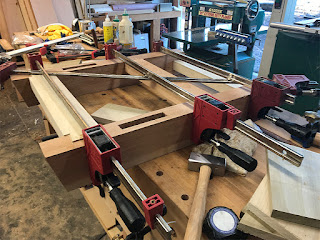
The first key is fitted, only three more to go. Someday I will figure an easy way to chop/make the key mortise but for now they are a PITA because they are short, narrow, with both ends angled, and deep. It doesn't get much worse. The only good news: The only critical surface is the front end where the key mates and I guess the fact there are only four of 'em.


BTW, the loose fit is on purpose, it is needed to allow the base to fit together and come apart. In fact as I look at this one I'm thinking it may be a little tight.

That is likely it for today, shop is hot and it is the first day off in a few so street running and other duties call.


ken


Saturday, July 27, 2019

Base Together, Keys Marked

The base went together so I could mark the long stretcher key mortises. Once those are chopped the base is finished.


Next up is installing the slab followed by the vise install. I'm still undecided on BenchCrafted with crisscross vs. Lake Erie wood screw and parallel guide. Still a little time to make up my mind.

That is it for the day, the shop is getting hot and the day job calls. Three to four hours of orals today and six to seven hours Sim check tomorrow. Not too long ago we would do the whole thing in one day, what a ball buster for everyone involved.

ken

New Chisels from Stanley Covington

My UPS girl delivered a pack of chisels from Stanley Covington the other day.
This time push chisels to fill in a couple of blank spots and he threw in a very nice old stock marking knife.


If you are thinking about buying some Japanese chisels you can't do better than Stan. If you can't tell I'm a fanboy, he has great knowledge and his customer service can't be beat. I think on these last chisels the time between the "go ahead" email and the UPS girl visit was three days. All the way from Japan, it doesn't get better. 

I normally fit all four long stretcher tenons to their mortise prior to glue up, this time I some way missed one tenon/mortise. Yesterday when I went to assemble the base so I could mark the mortise for the keys it would not go together. Damn I hate when that happens. Anyway after some butt scratching I got a caliper out and the #2 mortise was a solid 3mm small. I'm glad it is just a single brain fart and not a problem with all the M/T's.

Base unit on the bench to open up the mortise:


This part of the build is taking forever, mostly because of the heat and the day job. Whatever I'll keep beavering away until it looks like a bench.

ken

Thursday, July 25, 2019

Steve Voigt's Wood Stock Planes

For the last couple of days in between work, sleeping, and breaks for water and cooling off I've been cleaning up the new bench base units. It can be heavy going in the heat of July in Tucson.

One of the joys has been using Steve Voigt's Jack Plane for most of the heavy lifting.


Here it is after doing the bevel on the top rail.

Most of my stock is prepped with machines so I have little need for anything longer than a Jack so my basic set of planes are a Jack and a smoother. I have and use both pre-War Stanley planes with thin irons and woodstock planes by Steve and PhillyPlanes. My fav Jack is the one made by Steve.

BTW, there are modern metal planes in my tool cabinet by Woodriver, LN and LV that gather a lot of dust.

Wednesday, July 24, 2019

Funny Where Your Mind Takes You

I just ordered a box of 16 Harry's razor blades. It's not because they are great blades but because they are simple and cheaper than modern Gillette blades. That got me to thinking, always a bad sign, and on to the Google.

My first line of thought was how the stainless steel Wilkinson Sword Steel blades changed  the U.S. market in the early 60's. Kinda like A2 changed the market for chisels and other cutters from being able to have an incredibly sharp iron that may not stay sharp a long time to one where sharpness is ok but stays that way much longer than the O1 cutter.

Getting on Google to refresh my memory and looking for the cost of mid 60's Gillette razor blades was enlightening, I knew about the cult following of straight razor folks with forums and such (kinda like woodworkers 😆) but there are also folks that buy and use NOS razor blades and post about the merits of the different makes and brands. It is a strange world out there but I guess no different than my strange world.

BTW, the cost of the Harry's razor blades was just under $2 USD a blade and they will give an ok shave for maybe a week. A pack of 10 Gillette Blue Blades in 1965 cost $1 USD. In real 2019 dollars that is $8 USD or about $.80 USD a blade/shave. The cost/benefit is still about where it was in the 60's. If you could buy new Gillette Blue blades at the same price in real dollars a week's shaves would be about $4 USD vs. $2 USD for the Harry's blades. A really nice smooth shave for about twice the cost of an ok shave. The market spoke.

ken


Monday, July 22, 2019

Why You Need More Than One Workbench

I'm doing clean up work on the base units plus cutting the keys for the long stretcher tenons. When I get tired of doing one I switch to the other, short attention span dontcha know.

The keys could be made on any bench but cleaning up the base units is much easier if the bench has an apron like an English bench. To do the clean up on a bench without an apron you would need a deadman, a bench jack, or setting clamps cross bench. All of which are a PITA compared to using a deep English style apron. The problem with the English apron is it makes using bench dogs a PITA.

My answer is to have two benches, one with an apron and one without. The job determines which bench is used.


ken

Saturday, July 20, 2019

Sharpening Bench

Most of my shop time today will be spent sharpening whatever needs it and maybe a few that don't.

I do have some new Japanese chisels that need setting up but I'm not sure I'll have the energy or ambition for that much work. Anyway I haven't posted a photo of my sharpening set up in awhile and there is no time like the present to do so.


Here it is, a portable Moravian bench with the vise removed. The oil stones are on the left with strops in the center. The most used oil stone is a Medium India that I use for grinding bevels and to remove damage before going to the set up stones. The other oil stones are used mostly for narrow or shaped irons.

The right side has the water stones, in the tool tray are the man made water stones and my JNat finish stone. On the bench are the most used JNats to the left of the "pond". The pond has a stone holder and a diamond flattening stone. Some of the JNats will not fit in the stone holder, depending on the stone's thickness I use non slip mats either in the pond or to the right to hold'em.

The bench is a step or so off the left end of the main workbench and is pretty efficient. It doesn't take long to go from dull to sharp and because of that I will seldom put a dull iron to the side to sharpen later and I tend to sharpen before the cutter really needs it.

Next to the main workbench the sharpening station is the most important tool in the shop.

ken

Last of The Base Glue Up

Work combined with WX has kept me out of the shop for most of last week. I've today and tomorrow off but shop temps may still slow the work product down. This time of the year in the desert you just have to give in.

It's just a little before 0800 MST and I'm sweating like a pig. We are in the middle of Monsoon, unlike the other 9 to 10 months of the year our RH is high and sweat doesn't cool as well. As and example with RH below 10% and a OAT of 100F skin surface temp (wet bulb temp) will be in the high 60's. With today's RH of greater than 30% wet bulb temp will be in the 80's or even the 90's and instead of the sweat drying it will be dripping in your eyes and on your work.  I have a feeling about the only shop work today will be some time on the sharpening bench.

A misconception most have is that the hotter it gets the fewer clothes you should wear and moving air will cool you. That is great for DOM like myself, I may be old but I can still enjoy beauty when I see it. The physics of it is normal skin temp is about 93.5F and once OAT goes above that then heat movement is inward instead of outward. You need to cover up with loose clothes that wick the sweat and allow it to evaporate. There is a reason the Bedouins dress the way they do. Back in my motorcycle days I could ride tank to tank through mid-summer Death Valley and get the giggles because I could feel the heat boiling around me and yet I was almost too cold. The HD bad boys with their cut off T's and do rags would look at me like I was crazy at fuel stops but I was comfortable and they were close to dying from the heat.

But all is not lost today, there is still whisky and the pool with MsBubba, Sweet Maggie Dog and a ball.

At its worst, the desert is a great place to live.

I did glue up the second base unit this AM before it got too hot. It went together a little out of square but I was able to pull it close enough for bench work.


ken

Tuesday, July 16, 2019

Monsoon

With two days off over the weekend I only managed to get one base unit glued up. There was too much running the streets, honeydoes to be done, and entertaining MsBubba in the pool to get to the second unit.

The first base unit out of the clamps:


Second base unit awaiting glue up:


Saturday evening was our first Monsoon rain of the season. Most of the day MsBubba was complaining about Monsoon being a bust and we were not getting any rain. Wrong pool breath, the thunder soon ran us out of the pool followed very shortly by rain.

View out the back garden:


In 30 or so minutes it rained enough to fill the pool, turn the back gully into a raging river as it did the street in front, and flood my shop, which never happens.


We got a second Monsoon rain Sunday night, not as much but still pretty good.

ken

Thursday, July 11, 2019

Cleaning Up Base Parts

I'm cleaning up the base legs and stretchers in prep for glue up. There are a couple of boo-boos, mostly cosmetic with no effect on the structure, that I decided to live with but other than that I'm happy with the progress but the real tell is how the base units come out of glue up.


The legs are finished, four more short stretchers to go.

ken

Monday, July 08, 2019

Fitting Long Stretchers

I've finished fitting the long stretchers to the legs. Glue up of the base units is next.


That's all for today it is starting to get hot in the shop. Pool time with MsBubba, Sweet Maggie Dog and a ball. Then short nap followed by monkey suit on and then off to sit in a black box for a couple of hours.

A photo of Sweet Maggie Dog and the ball:


Life is tough here in the desert,

ken

Sunday, July 07, 2019

Bench Long Stretcher

Friday night I screwed up one of the long stretcher tenons. After several rounds of "what if" and "yes but" I made the correct decision and went to the woodstore Saturday and picked up a nice hunk of 12/4 Poplar and started over.

Here are some photos of cutting the new tenons.

V'ing the knife line:

 
Sawing the shoulder:


Finished tenon:


Next up is fitting the tenons to the base units. Once that is done I'll clean up the base parts and glue 'em up.

ken

Monday, July 01, 2019

Back To Work

I'm missing Sam at my feet and barking for a treat but as life must go on and the best way for that is to get back in the shop.

I'm not much of one for drilling and paring mortises. Every year or so I forget what a disaster the last time I tried it was. Well it's been more than a year and it is still a disaster. I'll save the leg but you will not be seeing any photos of the inside of the long stretcher mortise on at least that leg. That's the bad news, the good is what the inside of the long stretcher mortise looks like makes no never mind, it just needs to be a loose fitting mortise with intact shoulders.

It's back to chopping the mortise, a photo of getting ready to chop.


A Narex firmer chisel with a Hornbean handle makes a pretty good wide mortise chisel, not as good as a pigsticker but it's hard to find a 25mm pigsticker 😊.

Once the rest of the mortises are chopped it will be time to glue up the base units