Yesterday was one of those days that kick this OF's butt. I walked in the door of the office at 1400 and didn't walk out until 0200 this AM. All twelve hours were at a high stress level with the Feds looking over my shoulder. I will not go into details but let's just say because of client performance I was on a high wire without a net most of the day. My ass is still dragging. The good news is that scenario will not be repeated for at least a year.
I did have to run a rescue mission for MsBubba this morning and while out of the house I stopped by the woodstore. There I found a nice 8/4 hunk of Red Oak that is perfect for the vise chop. The vise backer is ready to work and I now have the wood for the chop. Tomorrow AM I'll start the vise install. By the end of the day my back will be whimpering no mas no mas. I'm not sure how many slab remove and replace there will be before the install is finished but it is a good number.
Time to go to the RV and watch Rachel, Friday's are almost always kick ass,
ken
Friday, November 30, 2018
Thursday, November 29, 2018
Wood Joy tools
Wood Joy sent me a 24" bow/turning saw. It is a thing of beauty. I already have a TFWW 12" bowsaw and use it all the time. It is much better than a coping or fret saw for cleaning out the waste between pins or tails. The 24"er will be used for sawing out chair/stool seat blanks.
One of the joys of woodworking is when you go down a different path there are always must have tools to buy :-).

ken
One of the joys of woodworking is when you go down a different path there are always must have tools to buy :-).

ken
Bench Peg Mortise And Fitting Slab
Drilling the peg mortises:

Cleaning up long (back) peg mortise:

Slab installed:

I've found for the first time fitting of the slab it is best to back the tusk tenons off a bit. Get the slab settled on the pegs then reset the tusk tenons to draw everything up tight. After fitting I tested the bench both lengthwise and across to see if I can move it. This sucker is solid there ain't no way no how it will move, short of a Mack truck running over it.
Time to fit the vise. First up chop or vise backer makes no never mind. I may start with fitting the vise backer because it is ready to work on. I still have not settled on wood for the chop.
ken
Blind Peg Marking
I marked the location of the pegs for securing/fitting the slab to the base yesterday. I have not drilled the mortises for the pegs yet. Because drill bits can vary slightly in size I need to test bit to peg to make sure of the fit. That is first thing this AM.
The blind pegging first step is to decide on peg location and drive a nail in far enough to be secure but easy to remove.

Next snip off the nail so it is lower than the slats used to support the slab while positioning but high enough to make a good mark and is also high enough to be easily removed.

Then position the slab. Once satisfied with position carefully remove the support slats and press, use a lumpy or whatever means needed to press the slab down on the cut nails, marking the position of the pegs and mortises.

The mark closest to the front edge of the slab will be drilled to peg size, single arrow. The back mark, with a circle, will be drilled elongated to allow movement of the slab. The marks on the base will be drilled to peg size and will have the pegs glued with around 25mm or so exposed.
An easy but ingenious process.
ken
Wednesday, November 28, 2018
Moravian Workbench
I'm in the short rows of my full sized copy of the portable Moravian workbench based on the Will Myers video . There is more information on Will's blog Eclectic Mechanicals. After building a number of Roubo and Moravian benches and working on each style bench I'm convinced for either first time builders or even experienced bench builders the Moravian style bench is the better bench.
I've built a number of workbenches the first was very loosely based on photos of benches in early issues of Fine Woodworking. I didn't have a clue but that bench was in my shop full time until being replaced by my first Moravian bench build a couple of years ago. Most of the other builds were based on variations of the French style or Roubo bench and for the last two years Moravian benches. There is nothing wrong with a French bench but I think the Moravian bench is a better bench for most woodworkers for several reasons, First is cost, then ease of build and finally the fact that the Moravian can be easily broken down and moved.
Wood is getting very expensive. For the same stability the Moravian bench will use less wood than a Roubo style bench. My French/English bench when built using European Beech ~three years ago cost just over $1200 USD for the wood. The current Moravian build that is approximately the same size using the same European Beech (literally out of the same stock of Beech at the wood store, I've been working the stack down for the last three years) cost less than $700 USD.
The joints used on a Roubo are not difficult for the most part but they are bigger than most woodworkers are use to making and they need to be well done to maintain stability. Other than the long stretcher mortise the joints on the Moravian bench are large but close to normal sized and the long stretcher M/T joint needs to be very loose, no precision needed. Bottom line on the build differences of the two benches, triangles are stronger than squares.
The most important difference is once a full sized Roubo is built, it is in place. Moving it to a new location is very difficult. The Moravian can be broken down to move. Even the full sized bench I'm currently building can be moved with ease. Each component, base, stretchers, and vise separates and can easily be moved by one person. The slab depending on size may need two people to move to a different location.
There is little difference in utility between the two styles of benches, it mostly depends on devices installed and how you like to work. Either bench will do the job and do it well.
Tuesday, November 27, 2018
Slab on Base
The base is finished except for clean-up. The tusk tenons are fitted and it is solid, I put the slab on to get a look-see. I'm happy with it.
Next up is blind pegging the base and slab. Once the slab is fitted I'll need to make the vise backer board, cut its tenons, drill the vise screw hole and cut a mortise for the parallel guide. Then make a vise chop and parallel guide. Chop the two mortises for the backer board in the slab and bottom long stretcher. And last make and install a tool tray.
Basically all that is left to do is fiddly work, time consuming with lots of install the slab, take the slab off, reinstall the slab and so on.

It is a heavy sucker and pretty big (see portable bench in background). Everything but the short stretchers are bigger and heavier.
I'm going to walk away from it now. Tomorrow I'll blind peg the sab and figure out what I will use for the vise backer board and maybe make it if it doesn't need a glue up. If it does, do the glue up.
ken
Monday, November 26, 2018
First Fitting of Long Stretchers to Base Units
As I promised Ralph yesterday here is a photo of the base put together:

This fitting will allow marking of the tusk tenon mortises. Then it all has to come apart to chop the mortises. While apart, I will also trim/plane the upper stretcher to match the angle of the legs and clean up the base units.
It will need putting back together to blind peg the slab and mark the slab and lower stretcher for the vise backer mortises. Back apart to chop the mortises and then back together to fit the vise backer. Anyway you get the drill, a lot of fiddling and apart/together to finish up.
I don't know if you can see the size difference between the portable bench and the shop sized one but I can tell you it's there. Taking the portable bench apart and putting together is an easy one person job. I'll bet MsBubba could do it with no help. I couldn't put this base together without MsBubba's help and you can forget about the two of us moving the slab to the base. I'll need the help of another OF or maybe young and strong the set the slab.
The legs and long stretchers are basically 16/4 European Beech, the top stretcher is 8/4 European Beech. The middle stretcher is 8/4 Sapple and the lower one is 8/4 Honey Locust. The slab is ~2180mmX460mmX90mm (~7'1"X 18"X 3 1/2") Beech. The height will be 875mm (34 1/2") and the width ~660mm (26"). I've not a clue how much it will weigh but I expect closer to 300 lbs. than 200.
If the portable bench is predictive, this sucker should be every bit as stable and solid as my hybrid Roubo/English bench and that one could hold my truck and not move. Think triangles vs. squares.
ken
Some Things Are Too Simple
Here I am 3/4 of a Century old and I'm still getting "damn that's simple, why didn't I think of it" moments. One yesterday from C.S. at the LAP blog was just in time. I have four stretchers that need trimming flush. I have a LV flush cut saw that works but is slow and short and these four stretchers are large. It wouldn't be like trimming a few dowels flush.
C.S, to the rescue, he faced a similar problem and solved it by taking a diamond stone to the backside of a Japanese saw, making the impulse hardened saw a flush cut saw. With nothing to lose I did the same to a junk HD pull saw.
Head slap, why didn't I think of it?

Works great, fast and a clean cut. Whatever I have a new tool in my toolbox.
ken
Sunday, November 25, 2018
Second Base Is In The Clamps
The second base unit is in clamps, no photo because it looks just like the first base unit. I'll let it cure till tomorrow AM. Once the second base is out of the clamps I'll assemble the bases with the long stretchers and mark out the mortises for the tusk tenons.
Like the first base this one is a couple mm out of square but with zero wind and a small gap or two in the joints. The gaps will be easy enough to hide, my question is why. Whatever it is a workbench.
BTW, this sucker is in the short rows.
ken
Like the first base this one is a couple mm out of square but with zero wind and a small gap or two in the joints. The gaps will be easy enough to hide, my question is why. Whatever it is a workbench.
BTW, this sucker is in the short rows.
ken
Saturday, November 24, 2018
First Glue Up
The forward, #1 and #2 legs, base unit is glued up and in clamps. Tomorrow I'll fit the stretchers to the aft base unit and hopefully get it in glue up and clamps. If that happens, Monday morning I'll put that sucker together and mark off the tusk tenon mortises and start chopping 'em.
Fun stuff to go. Blind pegging the top rails and slab. Making the vise backer and installing it. Making the vise chop, parallel guide, and mounting the vise.

The base is a couple /three mm out of squire but most important is in perfect wind. The left dovetail didn't pull up completely on glue up. I'm not sure why, it fit perfectly on the dry fit and there is a small gap at the bottom of the right upper brindle joint. All of which I can live with.
Not only can I smell the barn, I have it in sight just on the horizon.
ken
That Lucky Old Sun
I've an ear bug this morning while drinking my morning coffee before heading to the shop. While that lucky old sun has nothing to do, I've a full plate.
The biggest problem at this stage is getting a whiff of the barn. It is too easy to rush and make mistakes. For myself the best answer is to forget goals and just concentrate on the job at hand. Easier said than done when a build has taken as long as this one. Even though I know the reasons for the length of time; not being able to source the base wood, a month long vacation, other projects to finish and life. It is still too long in the making and it is time to finish and move on.
I've a couple of chairs and a desk/table waiting. I even have the seat blanks for the chairs cut. It is time to move on and put the new workbench to use. Just one problem, I've got to finish it first.
ken
Friday, November 23, 2018
Last Post Of The Day
It has been a productive shop day. All the long stretcher tendons are fitted to their leg mortises. The two top stretchers are fitted to legs I and II and I've cut the dovetails on leg I and II's lower stretcher. Tomorrow I'll cut the dovetail socketts in legs I and II and fit the lower stretcher.
Legs III and IV will follow. It would be great if I can glue up the base units Sunday.
The front base unit:

BTW, the top stretcher is Beech, the middle Sapelle, and the bottom is Honey Locust. No reason for the different woods other than they are what was in my wood pile and are strong and heavy. This sucker will come apart to move but it ain't going to be portable.
My body is letting me know no mas, no mas. It's whisky and Ibuprofen time.
ken
More Moravian Bench
I'm back at it this AM with sawing out the tenons on the back long stretcher and fitting the base legs. So far it is going well, I made a small mistake chopping the stretcher tenons in I didn't make them long enough. Unlike most M/T joints these need to be loose and I chopped 'em a little tight in length. It is an easy fix, just take 3mm or so off the bottom of the mortise. Of the first two fitted, one needed the fix. I'll soon know about the last two.
Sawing the tenon:

Sawing the shoulder:

On to cleaning up the tenons and shoulders before testing the fit.
BTW, this is the first time I've used the Bad Axe crosscut panel saw. Nice saw. Worth the money? Good question, whatever it sure is pretty.
I want to add, the photos are out of order. I sawed the shoulders first. That way when you hit the line the waste will fall off.
ken
Thursday, November 22, 2018
Hope Everyone Had A Good T-Day
We did the full T-Day thing for just the two of us. I'll be pretty sick of Turkey by the time we finish the leftovers. I expect Sam the Wonder Dog and Sweet Maggie Dog will love it.
Making progress on the new workbench. I've cut the tenons on the long stretchers and just need to make sure the tenons fit each mortise before glueing the base units. Once the base units are glued up it is pretty much downhill from there. A bit of fiddly work but other than moving the slab from its spot leaning against the wall to the base the heavy lifting and whacking huge mortises is done.
The bench should be finished before we leave for the Winter Solstice celebration in Houston. Of course there is a big difference between should and will.
Checking the fit of the long stretcher and the leg mortise:

The top two base stretchers have been fitted. I need to cut and fit the dovetails for the lower stretcher before I can glue up the base. The fat lady isn't warming up just yet but she's in the building.
ken
Wednesday, November 14, 2018
More Mortise Chopping
Seems I have an obsession with mortise chopping. Could be because that's about the sum of my shop time lately. As I posted before there are several ways to end up with a hole in or through a piece of wood.
The main ones are: A hollow chisel mortiser, a chain mortiser, drill most of the waste and then pare the "Vs" and sides to size, and using chisels to waste the wood. Sometimes finding or having a chisel of the correct size can be a problem but if you have a chisel of the correct size and you are only doing a few mortises I think beavering away with a chisel is the fastest and best way to make a mortise.
The mortises of the last couple of days are an example. I needed a large mortise to hold the tusk tenon that makes the base of the Moravian workbench. I had a 32mm bench chisel that fit the bill for width so now it was just a matter of chopping half way down on one side, flipping the board over and chopping through on the other side. Once through the board all that remains is cleaning up the ends and fuzzies on the sides. Reasonably quick and easy.
Here is a photo of the mortise after one pass down the length with a return to the starting end to level the approximately 30mm it took to get to the 30mm depth of the first pass. Each following pass will be slightly less deep because of restricted lever room but with a total thickness of the stretcher of 130mm it doesn't take too long to get to the 60 or 70mm depth needed on each side.

I probably will not get "break through" on the next pass but I expect it will happen on the third. Then it will just be a matter of cleaning up and getting the correct angle on the ends. The floor and top of the mortise needs to be 15* to match the angle of the legs.
ken
Tuesday, November 13, 2018
Beavering Away
Why do I save the hardest for last? I guess just because I'm drawn that way.
The middle short stretchers are ready to fit. The bottom short stretchers will have a dovetail so no mortise to chop. The mortises for the long stretchers are next, these are the largest mortises of the build, 32mm wide X 130mm deep X 145mm long. Come on Ibuprofen do your thing. Here is a photo of the first one after a couple or three passes.

Maybe three more passes to be deep enough to turn the leg over and come from the back side.
Each mortise takes a little over an hour with sharpening breaks, doggie butt scratching, and resting my noodle arm so I expect with adding the day job in, the Woodcraft Boot Sale Saturday, and only one day off this week, it may be next week before the base is glued up and ready to stand on its own.
ken
Sunday, November 11, 2018
Chopping Mortises
I've four through mortises to chop. The tenon is a one shoulder tenon that is close to splitting the stretcher in half giving a 20mm wide tenon and mortise. That presents a small problem. My largest pigsticker is 1/2", I could use the 5/16" pigsticker and do two rows inside the mortise and then clean out the middle. Or drill out most of the wood and clean up the "Vs" and sides with a paring chisel. I do not like either of those options, the double mortise is too slow and too much work, The drill and pare is also slower than just going at it with a correct sized chisel.
Awhile ago I bought a set of Narex firmer chisels on a lark, mostly because it is hard to find new firmer chisels and they were cheap. The handle shape and size sucks as with most Narex chisels so after a quick sharpening I stuck them in a chisel rack and forgot about 'em until today.
As mentioned earlier I needed a 20mm chisel and guess what, the Narex set had a 20mm firmer chisel. Well they are cheap enough not to worry about ruining. I thought about using a "chisel" hammer for a couple of seconds to protect the handle but rejected that thought, again because they are cheap. Out comes my normal mortise mallet, "lumpy", and off to the races.
While I use a lump hammer as a mortise mallet I do not go all Conan on the chisel. I find light taps gives better control and is faster than whacking it hard. The lump hammer just takes less energy than other hammers.
Anyway, after a quick mortise chop I'm pretty happy with the Narex chisel and for grins I looked at the Narex web site to see what they said about the firmer chisels:
The firmer chisel is a "Special tool for rough work. Blade tapers in width and lengthwise from tip to shoulder for sidewall clearance. Forged blade is made of traditional Cr-Mn steel and heat treated to 59 HRc. Ergonomic handle from hard and hefty hornbeam wood is strong enough to withstand heavy blows with a mallet."
Hornbeam handle is good but I expect if I use the chisel again I'll take a spokeshave to it and put a couple of flats to help orientation much like a pigsticker has.
The first of four mortises is finished:

The iron held up well, after finishing the first side I looked at and felt the edge. There were no chip outs, just a couple of shiny spots. I took a couple or three strokes on the medium India and a quick strop and it was back to work.
ken
Saturday, November 10, 2018
Top Stretchers
The base is coming along, I finished fitting both top stretchers this morning. I've a need to run the streets for a couple of hours, Home Depot, Costco, pick up meds, and maybe some Vietnamese for lunch. I should finish the running around it time to start on the middle mortise and tenons this afternoon. There is a slight chance the bases will be ready for glue up Sunday. I wouldn't bet on it but maybe.

ken

ken
Friday, November 09, 2018
Stretcher Fitted to Front Base
I've started the joinery on the bench base. First is the upper stretcher, then the middle mortise and tenon, and last the bottom dovetail. If MsBibba doesn't spot me and forgets I'm in the shop I may complete the leg joinery this weekend. I doubt it will happen but it could.
When I first started making Moravian benches I thought the three different joints on the base was an affection, maybe even showing off but after living with several benches I've come to appreciate the thought that went into and utility of the joints. I know broken record but the sum of the Moravian bench is greater than the parts.
Upper stretcher fitted to the front base:

Camera angle makes it look cattywampus. Everything is pretty square for just one stretcher fitted.
ken
Monday, November 05, 2018
Tomorrow
Please vote tomorrow if you have not already voted.
When I checked the stretcher blanks this AM one was a little off square. I'm not sure how it happened but whatever, MsBubba to the rescue. We ran it through the joiner one more time. It will be slightly smaller than the other but no big deal as each is individually fitted to its leg assembly and the stretcher mortise needs to be loose with about 6mm-10mm of vertical play.
For the most part the legs are marked out, I just have to look at them for awhile, long enough to "see", as Don Juan put it in "Don Juan a Yagui way of Knowledge", before I make the first cut.

ken
Sunday, November 04, 2018
More Bench Build
Slab is finished. Legs and stretchers are trued and dimensioned. The scut work is done. With almost every build, at this point I swear this will be my last bench. Who knows, someday it may be. Whatever, the enjoyable part of the build is next. There is still heavy stuff to move around but for the most part it is a one person job. The joinery is fun, a bench isn't furniture. it is a tool and if a joint isn't perfect as long as it is strong who cares. Same with a dent or two, after a month or so in the shop they will be joined by many others.
I'm taking a break, it is a beautiful Fall day in the desert and the Day of The Dead. I expect MsBubba and I will try to find a Mexican Cafe with a patio. If there are not too many cerveza consumed I'll start marking out tonight.
ken
I'm taking a break, it is a beautiful Fall day in the desert and the Day of The Dead. I expect MsBubba and I will try to find a Mexican Cafe with a patio. If there are not too many cerveza consumed I'll start marking out tonight.
ken
Saturday, November 03, 2018
Bench Build
The leg blanks are glued up and sized. The stretcher blanks are in the clamps. Tomorrow I'll size the stretcher blanks and maybe even start on the joinery. I'm working the backside of the clock next week so it may be slow going. There is no real hurry but I'd like to get that sucker off my plate, it has been hanging around the shop much too long.
Stretcher in glue up:

I had to enlist MsBubba to run the stretcher halfs through the jointer. Tomorrow after they come out of glue up I'll really need her help with sizing the stretchers. That's a good part of the reason I spent so much time trying to find suitable 12/4 stock.
I enjoy building benches but the parts sure get big and hard to handle in a one man shop. If anyone wants to learn to build workbenches have I got a deal for you :-).
ken
Thursday, November 01, 2018
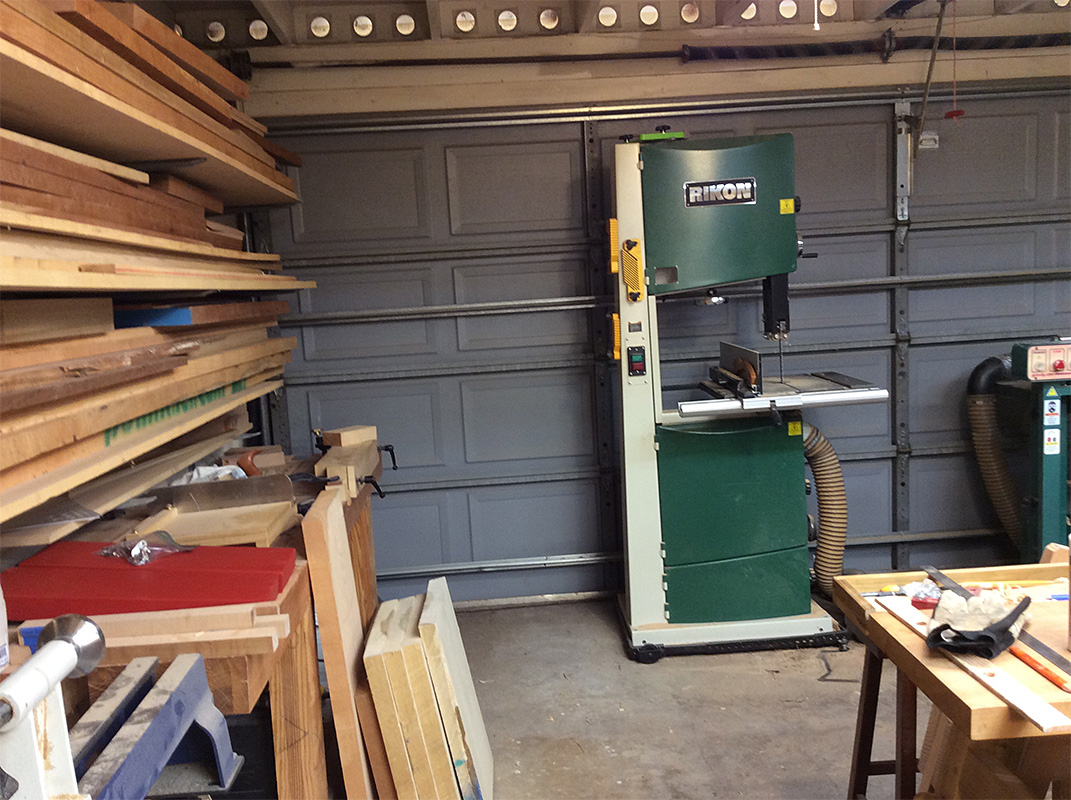
Shop Changes
Moving the 10 lbs. around the 5 lbs. space.
I've been trying to figure out what to do with the table saw for some time, I hope to never see a full sized sheet good in the shop and I've a track saw to break it down if one ever shows face. That makes the table saw obsolete except for cross cutting and a hand saw can do most of the cross cutting. The problem is my saw is a pretty good 3 HP cabinet saw and if I sold it the return would be pennies on the dollar.
For now I refuse to give it away but it sure has taken up some valuable real estate in the shop. A couple of days ago I was trying to figure out how to run the workbench 7' stretchers through the jointer. The only way was to move the jointer. That lead to moving all the machines to new places in the shop and the table saw with rip fences removed pushed against the west wall where it can still be used to cross cut if needed but very much out of the way and taking up little space. BTW, those are the workbench leg blanks leaning on the table saw and the workbench slab against the north wall.

From left to right at the front of the shop so the outfeeds go out the door are the bandsaw, planer, and jointer.

I'll give it a go this morning as I finish dimensioning the workbench legs.

ken
I've been trying to figure out what to do with the table saw for some time, I hope to never see a full sized sheet good in the shop and I've a track saw to break it down if one ever shows face. That makes the table saw obsolete except for cross cutting and a hand saw can do most of the cross cutting. The problem is my saw is a pretty good 3 HP cabinet saw and if I sold it the return would be pennies on the dollar.
For now I refuse to give it away but it sure has taken up some valuable real estate in the shop. A couple of days ago I was trying to figure out how to run the workbench 7' stretchers through the jointer. The only way was to move the jointer. That lead to moving all the machines to new places in the shop and the table saw with rip fences removed pushed against the west wall where it can still be used to cross cut if needed but very much out of the way and taking up little space. BTW, those are the workbench leg blanks leaning on the table saw and the workbench slab against the north wall.

From left to right at the front of the shop so the outfeeds go out the door are the bandsaw, planer, and jointer.
I'll give it a go this morning as I finish dimensioning the workbench legs.

The local Woodcraft is having a parking lot boot sale on the 17th. I hope to clear more "stuff" out of the shop then. Some really good tools will be on my table. I expect to take the portable workbench and the shave horse along with a lot of good chisels, some joinery planes, a bench plane or three, a dozen or more good hand saws, marking gauges out the kazoo, and so on. It is time to clean out the dust catchers. I don't expect either the shave horse or the bench to sell but the shave horse was a prototype and one of my next projects is to build another but "prettier" one and there is not room for two shave horses in the shop.
ken
Subscribe to:
Posts (Atom)