Monday, April 27, 2015

Bath Vanity Update

The day job has been taking most of my time so progress on the bath vanity is slow. I looked at using a wood top and tried several finishes but all but the Applebee's bar finish water spotted. It's a shame but it is what it is....ordered an Ebony composite top for the base, it should look OK.

I've made the boxes for the drawers, used Soft Maple.  It has been awhile since my last use of Soft Maple, I forgot how nice it is to work.

Here is the set up for cleaning up the drawer boxes:


And the box cleaned up:


Monday, April 13, 2015

First Coat Of Oil ON The Bath Vanity

The Bath Vanity base is complete, just needs finishing. I put the first coat of BLO on this AM and will let it set for a day or two before following with Tried & True.

The drawer boxes and the top are next. I expect in spite of what the boss lady wants I'll take my chances and make the top out of South American Walnut. South American Walnut is a little soft but with an oil finish turns almost Ebony black with a brownish under tone. It should like very nice with the Cherry as the Cherry darkens with age.

Drawer boxes, meh, as I looked for the wood to make 'em last night the hunk I need is buried near the bottom of the middle stack. At least that is the 4/4 stack and not the 8/4 stack. Still my energy and back both said no mas, no mas last night and weren't any happier with the thought of digging for it this morning.

Let's see I need a trip to the wood store for the South American Walnut, since I'm there might as well add a nice 4/4 drawer stock board as well.

Here is the back of the Bath Vanity base:


And the front:


Saturday, April 04, 2015

Tenon Buttons

I usually attach the top to the base via mortices and tenon buttons. I expect most have their own way of making the buttons but here is mine....if you think your way is better please do not let me keep doing it the hard way.

I usually use a 3/8 chisel to chop the mortises which means a 9mm tenon is just about right. I like Oak for the buttons because it splits easily and a 19mm thick piece of Oak works well. I'll cut the Oak into 70mm X 30mm strips. that gives me two buttons per strip.

First step is to mark two lines near the center the length of the tenon part, carry one line to the top face and the other to the bottom face.


Then on each side mark a line near the center, none of the lines need be exact:


Saw from each of the face lines stopping at the center line on the side, then supporting one end on something give it a good whack:


repeat as often as necessary for the number of buttons needed plus I always do a few extra:


These are for attaching the top to the bath vanity, I will be needing them soon.


Bath Vanity

The Bath vanity base is in the short rows. I've some mortises to chop, the ones for the bottom shelf slats and for the top's button mortises. Should only take a couple of hours to do the chopping.  I know it's weird, but for some reason I enjoy chopping mortises. Once all the remaining mortises are finished I will shape the legs, clean everything up and then draw bore and glue that sucker together.

I'm still undecided on the top and the drawer fronts. I'm leaning toward a dark top, MsBubba might object if asked, this may be one of those do then beg forgiveness times. I'm guessing I'll go safe and just use Cherry for the drawers.

It's been nice having several days off in a row....stuff gets done.

Mickey's Bench

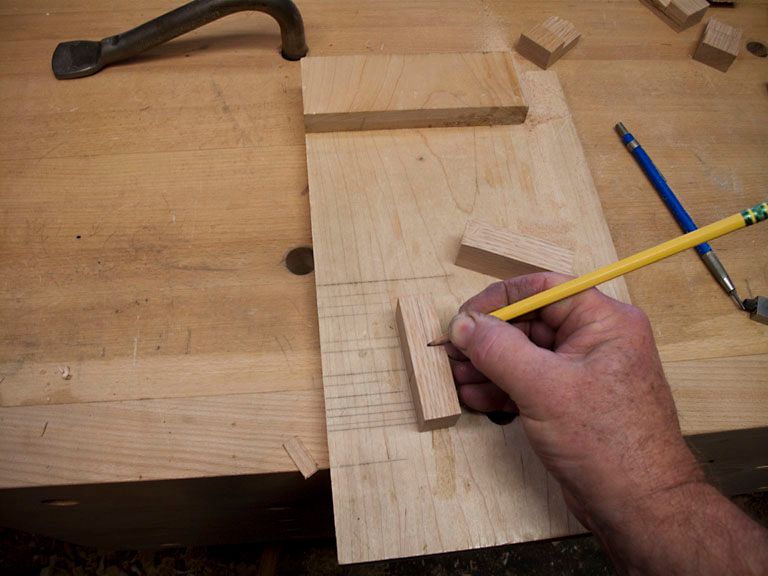
Around the first of the year a work friend asked if I would help him make a work bench. Sure no problem so off we go to Home Depot for a couple hundred board feet of construction grade DF. We stickered it, and covered it, and let it set as long as he could stand (a couple of weeks) before ripping the 2X12's down to working size. Then I explained it needed to set awhile to finish the major part of its stupid wood tricks after ripping.

After a couple of weeks he couldn't wait and we started truing and sizing the lumber. that's when one of his old heart problems flared up and he ended up in the hospital. Everything was put on hold for several weeks. This pattern repeated itself several times over the next months.

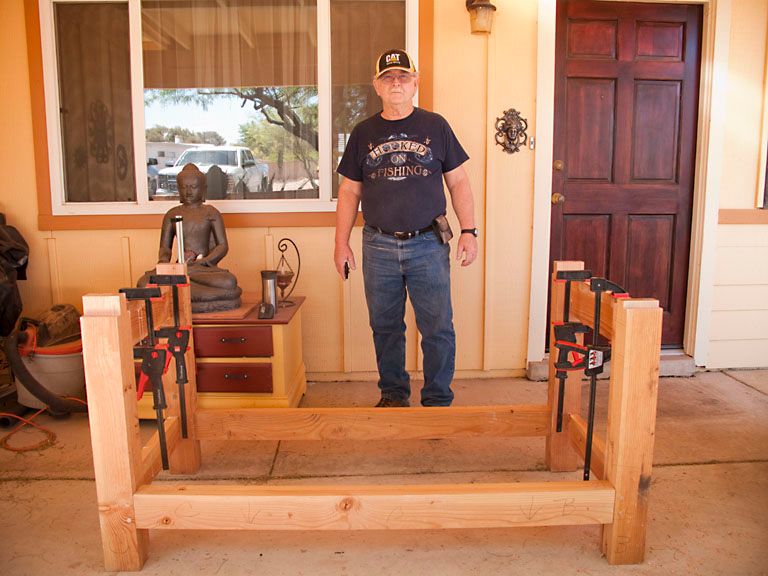
I'll cut to the chase: today we stood the bench up. He still needs to install his vises, drill some dog holes and trim the ends but he has a working bench. What should have been a couple of weeks job once the wood settled down ended up taking four months.

It's as ugly as granny panties with tons of mistakes because I would tell him what needed to be done and maybe show the procedure then leave it to him to do it. But as said many times during the build: "It's a work bench". That's the bad news, the good is: It is strong and solid. It sets on the ground with no rocking, the base is within a couple of mm of being square, the slab has no twist and is flat enough. It will make a hell of a good first work bench, a lot better than my first one.

A photo of Mickey with the completed base:


Wednesday, April 01, 2015

More Bath Vanity

I didn't have a lot of time in the shop today. Work asked me and one of the other instructors to write two Check Ride Plans of Action, one at KICT and the other at KMEM plus a new set of standardized questions for the Knowledge Test portion of the Aircraft Type Check (FAR 61.157 Check). I've been working on it off and on for several weeks but the Suits decided it needed to be finished yesterday. My shop time today sucked hind tit because of the deadline.

For a couple of nano-seconds I thought about a live edge slab for the top of the vanity. I even made a trip to the wood store to see if I could find a slab that would work but no joy. I expect that is a good thing because the more I thought about it the less I liked the idea.

I did get a little done. The bottom shelf stretchers are marked out and I sawed one of the stretcher tenons. Whoopee. Anyway here are a couple of photos. The first is sawing a tenon on one of the stretchers:


The second is of the finished tenon: