I took the motorhome to the shop yesterday so they can look at a couple of squawks before we leave for Oregon. The woodstore is just a few blocks away from the shop so I stopped by to see if there was any word when my Ash would be delivered. They said maybe the first week in August. I'm not betting on it but if it is I may be able to finish the bench before we head to the PNW. If not then the bench build could stretch into Thanksgiving. I hope not but it could.
ken
Saturday, July 28, 2018
Package of Love From UK
Several days ago the ten Marples bevel edge chisels from the UK showed up in the mail. They are pretty much what the photos showed and what I expected. The Boxwood handles are dark from use, there is plenty of blade life left, and the steel is in good shape. Whoever owned the chisels took good care of them.
That person was either or maybe both a carver and "old school". The backs have never been flattened. You can see a very slight bevel on the back of each chisel. Carvers are known to sharpen that way as are old school wood workers. I've heard Richard, The English Woodworker, talk about his father lifting the chisel a few degrees when working the back of his chisels. He usually says something like "I can't stop the old man from doing it".
I've a decision to make. Either I waste maybe a mm of steel to rid the back of the slight bevel or I just continue the practice. At this time I'm pretty agnostic. I will say I've plenty of flat backed chisels to use.
A photo of the ten:

Because I was out of chisel rack room I had to find someplace to store 'em. After a bit of butt scratching I figured if I moved the long chisel rack down a bit and the short chisel rack up just a little there would be room for another rack between. Because the racks were going to be so close I put a floor and guard on the two short chisel racks.
Photo:

A photo of the bench wall with the tool chest. I know it doesn't look like it but I've cleaned up the storage and moved almost all the tools that are not in daily or frequent use somewhere else.

As always click 'em to big 'em.
ken
Thursday, July 19, 2018
Slab Is Done.
Damn it is a heavy sucker. I'm a few years older than when I made the main bench slab and with it I did the whole thing single handed. This time I had help and the two of us old farts wasn't enough I had to call on help from the neighbor. Even with three it kicked our butts.
Whatever it is done and stacked in a corner out of the way until it is needed to fit on the base. For now I'm dead in the water until the 12/4 Ash is delivered.
After this afternoons sweatfest a break may be good. I just hope it isn't too long.
A photo of the slab standing in the corner:

ken
Whatever it is done and stacked in a corner out of the way until it is needed to fit on the base. For now I'm dead in the water until the 12/4 Ash is delivered.
After this afternoons sweatfest a break may be good. I just hope it isn't too long.
A photo of the slab standing in the corner:

ken
Wednesday, July 18, 2018
Slab Glue Up Done
The last of the slats/slabs are in the clamps. Towards the end those suckers were heavy for just one old fart to move around. MsBubba made it home just in time to help with the final glue up and moving everything in place to clamp. What a difference four hands and arms make.
Tomorrow a friend will help me take the slab out of the clamps, check it for wind and run it through the planer until everything that is not a slab is removed.
In the clamps:

Tomorrow a friend will help me take the slab out of the clamps, check it for wind and run it through the planer until everything that is not a slab is removed.
In the clamps:

ken
Outer Slabs
One outer slab is out of the clamps and one is in until I return from my AM Sim. Those suckers are getting heavy, or at least they seem to to this OF. Truth is they are slightly less than 70 lbs. each.
This afternoon I'll join the two outer slabs with the middle slats to complete the bench top. Tomorrow I've asked a friend over for whisky and a little help running the joined slab through the planer to finish it off.
Now I just need to get my hands on the 12/4 Ash to start the base. I would like to finish before the Oregon trip but who knows, depends on the Ash and vise screw.
One glued up outer slab and one ready for glue up:

MsBubba leaves tomorrow for Houston to "help out" with the new Grandpeanut. The dogs and I will be without adult supervision for a few days. Extra dog biscuits for all and I might be able to have a big bowl of sticky rice :-).
ken
Monday, July 16, 2018
Slab Glue Up
I've started gluing up the slab. Because of the weight and size the 10 slats will be glued up 2 at a time. Once I have 5 sets of doubled slats I'll glue 2 of the doubled slats together to make the two sides of the slab and then finally use the remaining doubled slat to tie the two sides together. It will take longer but reference surface clean up will be easier and I will only have to deal with the full weight of the slab and a smaller reference surface clean up at the end. Doing it this way will also allow use of the machines with the exception of the last reference surface clean up. Once all the glue ups are together I will have to do the final reference surface clean up by hand but the top of the slab can be cleaned up and dimensioned with the planner. I expect I'll find a friend to help with the final passes through the planer. Hopefully a little single malt or some Jack will be enough to entice.
As I lay the slats out for glue up I check for grain direction and mark with an arrow. You may be able to see the arrow in this photo:

Next is about a 1/3 bottle of glue and clamp those suckers together, then walk away for a few hours:

Click 'em to big 'em.
In the background are the other 6 slats waiting their turn, One set is out of the clamps. It's slow going but for the most part easier on the back.
BTW, if it all fails and things get cattywompus I've 25mm to play with before reaching my desired minimum slab thickness.
ken
Sunday, July 15, 2018
Pre-WWII Marple Chisels
For awhile I've chased pre-WWII Marples chisels. That quest may be over. I've a full set of Boxwood handled firmer chisels, a near full set of Boxwood handled paring/pattern maker chisels and gouges, and today I whipped out the AmEx to pay for 10 beautiful Boxwood handled beveled edge chisels all pre-war.
If I could find a set of Ash London pattern handle firmer or bevel edge pre-war chisels I would buy but I feel no need to look. A stumble across would be nice but...
Photos when they arrive from U.K.
If I could find a set of Ash London pattern handle firmer or bevel edge pre-war chisels I would buy but I feel no need to look. A stumble across would be nice but...
Photos when they arrive from U.K.
New Grandpeanut & Workbench
At one point last night MsBubba, while I slept, whispered we have a new kid in town. I'm not sure of her name or even if it was a dream but I'll bet it's true.
Yesterday I ripped the Beech lumber into slats. Today starts the real work on the bench, getting the slab wood ready for glue up. other than the completed slab and base, these are the heaviest hunks of wood to be worked. It's almost a toss up between doing the prep by hand or machine. I'll start using the machines but may end up finishing mostly by hand.
Here are the rough cut beech slats. Each is approximately 45mmX100mmX2150mm. Two of the slats will be dressed on only one edge and one face. The rest will be dressed on one edge and both faces.

I'll glue up in two's so I'm only dealing with one glue surface at a time. It takes longer that way but I think is easier and less backbreaking until you start dealing with putting the glue ups together.
Once everything is done I'll be shooting for a finished >75mmX~400mmX2100mm slab. That's in the range of 3"X16"X7' for the metric challenged. BTW, each slat weights ~17 lbs., the finished slab will be close to 170 lbs. My best guess the finished bench will be over 300 lbs and maybe close to 400 lbs.
It should be heavy enough to stay put but at the same time break down into manageable parts for moving when needed. That is the major problem with the French/English main bench, without the neighborhood or a fork lift that sucker is immoveable.
I talked to the woodstore manager yesterday, I made a return trip because of a BF the day before and I was short one board of Beech, he said the order for my 12/4 Ash was made too late to be in yesterday's shipment. That was the reason it wasn't there but he would see if they could get a special delivery next week. We will see, I really don't want to drive to Phoenix and back.
Anyone want to learn how to make a Moravian bench? Have I got a deal for you :-).
ken
Friday, July 13, 2018
The Game Is On
I've started the new shop sized Moravian workbench. This morning I ordered the vise screw kit from Lake Erie Toolworks. They said to expect four weeks for delivery. I hope it is a little quicker if all goes well and the base wood is delivered next week I should be ready for the screw within the four weeks.
I went to the woodstore looking for slab wood. With the exception of Poplar, European Beech is the cheapest hardwood in the store. Go figure. I have no problem with it, Beech makes a great slab, I just wish I could get it 12/4. Of course after wrestling almost 70 BF of 8/4 beech into the bed of the truck and out again in +38*C temps I may have been happy it wasn't 12/4.
Here are the Beech boards ready to cut into 100mmX2150mm boards for slab glue up. Even at the reduced size they are heavy suckers.

If the Ash can't be delivered by next week, I think there is enough 12/4 White Oak in the woodstore stock for the base. Only problem is it would almost double the cost of the base.
It is getting harder and harder for this OF to work with bench timbers without help. I've not a clue how I'm going to address it other than working smarter because I would hate to stop building benches. Getting old sucks.
ken
Thursday, July 12, 2018
Marple Chisels Old vs. New
As usual I awoke early, too early to bang around in the shop. What will usually occupy my early morning time is just putzing around cleaning the shop or sharpening iron. This morning what caught my eye was a set of post WWII Marples London pattern firmer chisels. I picked them up several months ago on a whim, not a clue why because I will usually pass on post war chisels. Let's cut to the chase.
As I was looking them over I was surprised by the weight and feel of the chisels. They felt heavy and unbalanced. I just happen to have a pre-WWII London pattern firmer to do a A&B comparison. The pre-war chisel weighed in at 92g, the post-war 102g. Handle size was also different. Pre-war handle measured just under 25mm, post-war just over 26mm. Anyway small differences but with a big difference in "feel".
A photo of the two:

Click image for larger version.
Pre-War on top. Some of the weight and length difference could be because of the number of sharpening but the post-War handle is much bigger.
I haven't used the post-war chisels yet so no clue as to the quality of the iron. Anyway something to amuse and keep from waking MsBubba too early.
ken
Tuesday, July 10, 2018
Tool Tray
I shipped the changing table out this AM. Sure was good to get it out of the shop, sure cost a penny or two to get it to Houston.
My shop is too small and has too many benches, machines, and stuff to have more than one project going at any time. I expect a new shop sized Moravian bench is the next project but before that build I wanted to fix something that was bugging me about the portable Moravian bench.
I have a split slab on the main bench and it works very well. Because it works well on the main bench I tried a split slab on the portable bench. Problem, there is less real estate on the portable bench making the secondary slab is too small. There was always danger that things would be knocked off. It never happened but there were several close calls. Anyway cut to the chase: After thinking about it and several seconds of butt scratching I decided the best approach would be to re-saw the slab and use it to make a tool tray and that's how I spent the afternoon.
The good news, by using the bottom of the slab for the bottom of the tool tray it already had the holes for the pegs and all I had to do was clean it up after the re-saw and and take the top part of the re-saw to make the edge of the tool tray. It was pretty quick and dirty, the only reason it took most of the afternoon was waiting for the glue to dry.
Anyway here are a couple or three photos, one staged as if working:

From the other side:

I had to put it to use:

Damn I love this little bench. I find I use it as much as and maybe more than the main bench. The wood screw vise is faster than the QR metal vise and holds better. Also the bench is perfect height for planing with metal planes.
As always click 'em to big 'em.
A couple of things I think I will like about the tool tray: I kept the split so I can hold chisels, saws, and squares in the split. I can also use the split to clean out the tool tray without removing it from the bench. I may do the same type tool tray on the big Moravian bench.
ken
Monday, July 09, 2018
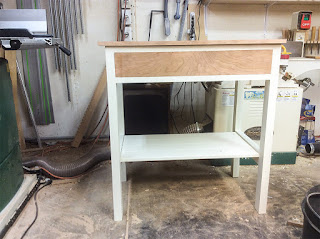
Changing Table Finished
I just finished that sucker with one coat of Danish oil. I expect a couple more coats and then I'll ship to Houston. She went in labor this AM, so it is a good example of "just in time" supply. Who said woodworkers couldn't be modern.
Ralph, I decided to not put a rail on it. I'll do a post on "blind pegging" later.

Ken
P.S. Did I mention how much I hate painting. MsBubba will pay for finking out on me :-).
Ralph, I decided to not put a rail on it. I'll do a post on "blind pegging" later.

Ken
P.S. Did I mention how much I hate painting. MsBubba will pay for finking out on me :-).
White Mountains For The 4th
MsBubba, Sam the Wonder Dog. Sweet Maggie Dog, and I spent the weekend in Alpine, AZ. Alpine is a throw back to the 1950's small western mountain town, elevation 8,000' MSL. It has a small tourist component (folks from the southern desert trying to escape the Summer heat) but is mostly ranching and timber. The small tourist component is because it is on the north AZ/NM border and far from anyplace (260 odd miles from Tucson) and hard to get to, seven to eight hours in the motorhome over mostly narrow, twisty mountain roads. BTW, one of the best motorcycle roads in the U.S., HYW 191 or by it's old number HYW 666 the Devil's HWY is the southern road into Alpine, it is unusable by the motorhome. HYW 191 runs from the Mexican border to Canada though some of the most spectacular parts of the western U.S. such as Monument Valley, Flaming Gorge, Jackson, WY, and YellowStone.
Saturday morning there was a small 4th of July parade and the evening featured fireworks, kinda neat. At 8,000' it was cool to cold at night and Monsoon was active with afternoon showers. MsBubba and I kayaked, the dogs swam, we cooked out and did a little reading and napping. In other words a very good and relaxing weekend.
This morning I picked up the needed drawer slides, and fitted the drawer and front piece. All that is left to do is make a pull, clean up the top and drawer face, put a little oil on the bare wood and ship that sucker to Houston.
The top and drawer face ended up being made from some Cherry shorts and one piece of Cherry scrap I had in the shop.
Not my best work but then I expect it will be fire wood in a year or so. BTW, did I tell you how much I hate painting.
On to making a new workbench and I expect some chairs to follow. I found some 12/4 Ash for a good price to make the bench base and I expect some chairs as well. I should have it in hand in a couple of weeks.
ken
Saturday morning there was a small 4th of July parade and the evening featured fireworks, kinda neat. At 8,000' it was cool to cold at night and Monsoon was active with afternoon showers. MsBubba and I kayaked, the dogs swam, we cooked out and did a little reading and napping. In other words a very good and relaxing weekend.
This morning I picked up the needed drawer slides, and fitted the drawer and front piece. All that is left to do is make a pull, clean up the top and drawer face, put a little oil on the bare wood and ship that sucker to Houston.

The top and drawer face ended up being made from some Cherry shorts and one piece of Cherry scrap I had in the shop.
Not my best work but then I expect it will be fire wood in a year or so. BTW, did I tell you how much I hate painting.
On to making a new workbench and I expect some chairs to follow. I found some 12/4 Ash for a good price to make the bench base and I expect some chairs as well. I should have it in hand in a couple of weeks.
ken
Sunday, July 01, 2018
Cleaning Up Changing Table Drawer
The changing table in the background has a dusty green base coat and two coats of white. I expect it will need at least three more coats of white. It sure looks blue in the photo, in reality the green is still showing through.
I'm finishing up the drawer, the sides will need planing both to clean up and to narrow.

The front and back tails are flush, just the sides to go.
I should finish prepping the top boards and I hope get 'em in the clamps sometime today. The fat lady in in the building.
I'm finishing up the drawer, the sides will need planing both to clean up and to narrow.

The front and back tails are flush, just the sides to go.
I should finish prepping the top boards and I hope get 'em in the clamps sometime today. The fat lady in in the building.
Subscribe to:
Posts (Atom)