Monday, February 22, 2016

Odds and Ends

The last couple or three weeks have been a zoo. As always it is work related activities causing the zoo. Five days off in the month of Jan and maybe the same in Feb.  Enough kvetching.....on to a couple of things I've wanted to post.

First is the new dovetail square. So simple but works better than anything else Ive used. setting the pin board:


Setting the dovetail square:


Setting the Tail Board:


Ready to mark:


It works and is easy to make and use.

I received a new double iron smoothing plane from Steve Voigt a couple of weeks ago. Here is a little tool porn:


And a photo of the plane's mouth:


Not much work has been done in the shop since the first of the year. Mostly tool maintenance and sawing practice just to keep the skills sharp. I have been fettling a couple of Kanna's as well, once finished I'll post some photos. 

As always....click 'em to big 'em.

ken   


Monday, February 08, 2016

Dovetail Square

Derek Cohen posted some photos of a small bench appliance on the SMC forum. It's for squaring up tail and pin boards for marking out the pins. I made one last night, in between doing my one day off from work this week "honey do's". It was a quick build and a good thing because shop time was very limited. That woman drives me like a rented mule of course sometime I act like a rented mule as well :-).

It has a simple pinned lap joint holding some scrap Cherry legs together. In use, raise the pin board just higher than the vise jaws with a thin piece of scrap. Use the same piece of scrap to hold the tail board at the correct height, square the tail board with the dovetail marking square and mark out your pins. A piece of cake or as my foreign clients would say "a sheet of cake".


This morning I made a quick and dirty set of dovetails to test the appliance out.  It is a winner, the base alignment was perfect. I could not feel the slightest difference between the boards. Now the question is....Why didn't I think of it first?

ken

Tuesday, January 26, 2016

Home From Houston

I gave in and flew the peanut skies to Houston and back.....That will not happen again, seventeen stinking hours or not it makes no never mind, I will not step foot in an Air Carrier again if I can drive. I hope they open a Chunnel to the UK before I croak.

I made a few photos while in Houston, most will be trashed, a few will be sent to the peanut's Grandmom aka MsBubba and his Mom and a couple will be added to my work. This is one I couldn't resist:


Click it to big it.

Not much will go on in the shop other than tool maintenance for a couple of weeks. Work is crazier than normal crazy, guess I have to pay for taking a few days off.

See you guys on down the road,

ken  


Monday, January 18, 2016

They Are Done

The fat lady has sung her song, the crops are in the field and the cows are in the barn. The grandpeanut's chair and table are finished and waiting for the UPS girl (BTW, did you ever see the photos of my UPS girl? Ah but I digress). To have a hope of getting the table and chair to Houston in time they had to be finished no later than Sunday night and someway somehow I made the deadline. Not too bad for my usual slower than a slug work pace plus dealing with an insane work schedule. I made the first cut January 3td and finished January 17th.  A couple of 16 hour shop days this weekend helped as did having most everything needed in the shop. I also think MsBubba could see the insane, driven look in my eyes. She cleared the deck and left me alone Saturday and Sunday.

Some of the design decisions were out of my hands. Such as the chunky legs and the "Chalk Board" paint on the top. I must say the black top works but I would still have liked the legs shaped to lighten the look.  Here are a couple of photos of the finished table and chair:


And one with them in "working" position:


Click 'em to big 'em.

The painted parts are Poplar with Red Pepper Milk paint on the stretchers and aprons and "Chalk Board" Latex paint on the table top. The chair and table legs are Beech finished with Danish Oil and the chair slats/seat is Cherry also finished with Danish Oil. All the joints are drawbored M/T as per my usual way none of the M/T joints are glued.  The only glued joints are the edge joints to form the table top. The seat slats are attached to the chair with Black Oxide "Highpoint" #10X1 round washer head screws with #2 Square Drive (sorry Bob). I wanted to use brass screws with slotted drive to attach the slats but couldn't find any in time to finish under the deadline. The table top is attached with mortice buttons using the same 'Highpoint" screws.

I'll deliver 'em to the UPS store this AM before going to work. After that they are out of my hands but I expect I'll tote the note for whatever it costs to have the table and chair in Houston in time for Levi's B-Day.

See you guys on down the road,

ken


Monday, January 11, 2016

Chair Base Together

I put the chair together yesterday and showed the boss how plain it was with no paint. Beech and Poplar just aren't the most exciting woods with just a oil finish, so she Ok'ed painting the stretchers but remained firm about no shaping of the legs. Not a biggie, less work and now I can get on to the table build.

Made one mistake when pegging the chair. I had 35mm pegs of Maple for the sides and 30mm pegs of Oak for the front bores. Someway one of the maple pegs got mixed in with the Oak pegs. By the time I noticed I was driving a Maple peg into a Oak hole it was too late. Needless to say, when I look at the chair that is the first place my eye goes. BTW, one of the Afghan tribes believes only Allah is perfect so all their rugs have a "mistake". That's my story and I'm sticking to it.

When I first arrived in country Afghanistan I noticed the rug merchants putting their rugs in the road so cars and trucks could run over them. Made no sense until someone explained that new rugs were almost commodity cheap but antique rugs were worth a lot of money.  Never underestimate Eco Man, if there is a way to make a buck someone will do it.

I'm still undecided on the seat. My first thought was White Oak but after looking at the completed base I'm leaning towards Cherry. I know I have enough White Oak in the wood pile but I have to dig a little for the Cherry. We'll see.

Anyway, here is the chair base. Click it to big it:


ken


Saturday, January 09, 2016

First Dry Fit

I haven't cleaned up the tenons. There's not much to do, I just need to chisel off the trash at the base of the tenons and they should pull up nicely.

I wanted to get an idea how the finished chair will look, at least how big it will be so I rough fitted everything together. None of the joints are pulled up tight and the seat slat is just something out of the cut off pile that was close to the correct length.

If you squint and look sideways it kinda looks like the finished chair. I expect I will shape the legs and back a little to lighten the look and for now I'm planing to use BLO on the legs and seat. The stretchers I plan to paint with milk paint, black under coat with a red finish coat.

Anyway, I'm getting into the short rows on the chair with the table to follow.


ken

Thursday, January 07, 2016

Sawing the Tenons

The Grandpeanut's chair is coming along. The mortices are chopped and I've started sawing the tenons. The first fit right off the saw with the exception of cleaning up a small bit of left behind "stuff" on one of the shoulder.  Sure is nice when it works that way, when it doesn't it can really slow the process.

I'll drill all the mortices for the draw bore pegs before I fit the rest of the stretchers. That way I can mark the tenons as I fit 'em. One time together, mark the tenons, pull it apart, drill the tenons, back together and peg that sucker.

Here is a photo of sawing a tenon:


And one of the bottom stretcher fitted to the back legs:


I'm still undecided on finish. I'm leaning towards BLO or Tried and True on the legs and seat but painting the stretchers with a black Milk Paint undercoat and red Milk Paint overcoat. 

I've a couple of weeks to finish the build, I may not finish both in time for shipping to Houston before his birthday but I hope to at least have a photo of the finished chair and table by the big day. The peanut, I'm sure, could care less, but it would make Grand Bubba happy.


Tuesday, January 05, 2016

Started on the Grandpeanut's Chair and Table

After a bit of butt scratching, a little searching on the web, followed by putting some rough ideas in the journal, I kinda had enough info or at least enough of a rough plan to dig through the wood pile for useable stock. BTW, this build, a table and chair for Levi's first birthday, is truly flying blind without an Instrument Rating. I haven't a clue what I'm doing.....Of course some would say that is usually the case....whatever.

I found a 8/4 scrap of Beech that I could just get the legs out of for both the chair and table and a piece of 4/4 Poplar for the aprons and stretchers. For now I'm planning on using some White Oak for the seat and table top but that is a maybe.

You can't tell much from either of these two photos but I have 'em and I control the mouse. The legs are rough milled and set in approximate position.  Photos from the front and back:


I've since finished milling and marked out the mortices on the legs and the tenon on the stretchers:


Before going to work yesterday I managed to chop one of the twelve mortices for the chair. I expect to beaver away on the remaining mortices today as long as I can before my 16:00 day job "show".

The table will wait until the chair is finished so I can be sure they fit together. 

BTW, yesterday morning before I finished final mark out I had a bit of re-design panic....."Only on the back did I 'complete the box,' oh shit it will fall apart at the first contact of kid butt." I went back and googled kids chairs and most of them had legs with only top stretchers. Re-design panic over, if it falls apart I'll just blame google.  To add some strength I will use a slat seat screwed (thank you Bob) to the top rails. 

More photos to follow as the build progresses, I hope they will be a little more interesting.

ken
 

Sunday, January 03, 2016

Winding Sticks

I have marching orders to build a small table and chair for the grandpeanut's first birthday this month. Not wanting to rush into things I looked around the shop for a little one day project. A small hunk of Mahogany caught my eye, my guess is this hunk of Mahogany has been following me around the country for over 40 years. It was too small to do anything with but too big to throw away. As I looked at it I figured it was the perfect length for a set of winding sticks. Of course a set of winding sticks must have a light/white insert and nothing in the wood pile was what I wanted. Off to the wood store for coffee and to see what I could find.

Found two things that would work, some Holly pin turning blanks and one of the guys pointed out some table saw zero clearance inserts. Both followed me home.

I used the table saw inserts but next time it will be the Holly. The inserts trap sawdust and I tried several things to bring 'em back to white with no joy. they are not bad but the Holly would have worked better.

Anyway here are some photos of a fun little one day project (if you spend a lot the day geeking and playing with the critters) that uses most of your hand tool skills but doesn't require much butt scratching or heavy lifting.


One more:


Click 'em if you want to see 'em.

ken


Tuesday, December 29, 2015

More on CBN Wheel

More on the CBN wheel in answer to a couple of questions about yesterday's post.

Here is a overview of the grinding station I have set up in the "tool room" aka Fibber McGee's closet:


The Tormek with a 600 grit CBN wheel is on the right and a low speed grinder (I think from Woodcraft) with a "pink" wheel and a 180 grit CBN wheel on the left. The rest for the pink wheel is from Veritas and the CBN wheel has a Tormek GBM-100 tool rest.

Because you can not dress the CBN wheel to make it co-planer you have to adjust the GBM-100. There is the rub, as Derek Cohen put it getting there "is not for the faint hearted". I got there but....it took a lot of back and forth adjusting the Tormek tool rest then make a test grind, re-adjust the tool rest, make a test grind.....I ending up digging out a paint can opener to make the test grinds. The other problem is the CBN wheel removes metal so fast even when you are co-planer the bevel can end up with scallops if you let the speed of cross movement or pressure vary as you grind. Again all those can be overcome with practice but a CBN wheel on a low or high speed grinder is not a turn-key answer. Depending on how much grinding you do its advantages may be enough to make it worth while but....it ain't plug and go.  

Here is a close up of the grinder with pink and CBN wheels:


The low speed grinder with the Tormek tool rest was good enough when I heard there was a 50mmX250mm CBN wheel made for the Tormek T-7 it was a no brainer, I couldn't get my AmEx out fast enough. While not cheap, I expect I would have toted the note at twice the price.

On the T-7 all the fiddling is taken care of, it is, from what I can tell, plug and play. On the T-7 the rest is built in co-planer, the speed is slow enough, the grit is fine enough and the wheel is wide enough to control the aggressiveness of the CBN wheel. The ground bevel is flat, smooth, and just for Ralph, ninety degrees to the side. Honing the ground bevel was very easy, I did it freehand on oil stones and it was fast, might have been faster on the Shaptons. 

If you already have a Tormek T-7 and the slowness of the grind bothers you you owe it to yourself to make the change, if you don't have one it might make it worth while to buy one.  I have to admit the T-7 may have been headed for Craig's List if not for the CBN wheel even with all the advantages of the T-7 if it is only used for grinding, the slowness of grind using the water cooled 220 grit Tormek stone was hard to overcome. The CBN wheel is a game changer.

Monday, December 28, 2015

CBN on The Tormek

The UPS girl dropped off a 600 grit, 250mm (10")X50mm (2') CBN wheel for the Tormek this AM. I'll have to live with it for awhile but first impression is...."sweet".  There was no problem fitting the wheel, off with the old on with the new. Checked for square with the jig support and if not square it's close enough. Did a "eeny, meeny, miny, moe" on the chisel rack and the 1" Stanly 750 won the honors.

As expected the CBN wheel cuts the bevel very quickly and did not leave an exceptionally deep scratch pattern. The bevel cleaned up nicely with the soft ARK. I followed the soft Ark with the translucent Ark and a few pulls on a strop with "green stuff".  You can't see it or feel it but I got very nice edge very quickly.  Maybe not better but it was much quicker to establish a new bevel and get to a working sharp iron vs. either the Tormek with the wet 220 wheel or the slow speed 8" grinder with the 180 grit CBN wheel.


As you should be able to see, the polished bevel is nice and even across the hollow grind.

That was the good part of the morning. 

The other:

I spent most of yesterday prepping and dimensioning some White Oak for a step stool build. In fact I had marked, sawed, and cleaned the waste from the tail board when I noticed a very small crack through one of the tails. Need I go farther? Of course not, when I went to the shop this morning to scribe the pins the crack had enlarged and now ran almost the full length down the middle of the tail board. What are the odds that there isn't any more of that White Oak board?

Here is the tail board just after cleaning up the sockets and quitting work for the night:


Oh well....Stuff happens.

BTW, it had been awhile since I had worked White Oak. White Oak really saws beautiful, it's great to work with a chisel, but damn it can be hard to face plane if there is any reversing grain. I'll bet the plane iron spent more time on the sharpening bench than than it did on the Oak yesterday.


A last photo, the CBN wheel on the Tormek:


Click 'em to make 'em big.


ken

Saturday, December 26, 2015

Back From Rocky Point Mexico

We traveled back to Tucson on Christmas day. It was a good trip, WX was close to perfect, the critters swam till they couldn't swim no more, I drank beer, ate tamales and tacos till I couldn't eat no more, MsBubba....maybe she could have sit on the beach a little more but it was time to get back to the shop.

MsBubba, the critters and most important a tennis ball:


We celebrated the most important day of the year, MsBubba's birthday, while there:


I watched a couple of Videos while enjoying a few single malts after a hard day on the beach. A couple of takeaways; Charlesworth's are worth the time spent watching, Cosman is as well in spite of his selling, and Schwarz made a couple of mistakes in his "Super-Tune a Handplane but was also worth watching.

A couple more photos because I can:


Last one:


As always....click 'em to big 'em.

It's good to get back to the shop. I spent the morning fettling a old Stanley #5, I believe a type 12. It had been on the rack for a few years and still had a OEM iron and chip breaker which I changed to a Vertias O-1 iron with a Hock chipbreaker. I flattened the sole and had to enlarge the mouth for the Vertias O-1 iron. I ended up A&B'ing the iron, sharpened the first time with the LN honing guide on waterstones and didn't like the feel. Sharpened a second time with the old favorite, freehand on a soft Ark and a Hard Black Ark followed by a Horse's Butt strop with green stuff. Much better, the plane could be a keeper.

One last item, I have a 10" CBN wheel for the Tormek in the mail. Report when it arrives. BTW, I ground the skin off my right thumb this morning getting enough pressure on the iron while using the Tormek, happens more often than I like to admit. I expect the CBN wheel will be faster and not need the pressure, it may save some thumb skin. 


Saturday, December 19, 2015

Off to Mexico for a Few Days

The last couple of weeks haven't seen any production from the shop. I'm in between projects and I have been doing an early AM Initial Line. When you have a 0100 show not much gets done that requires thinking. I finished the guys up Friday morning, rested most of what was left of Friday and today has been spent getting ready to go to Mexico for a week.

What I have done in the shop for the last couple of weeks is sharpen a lot of iron and play with my planes.

I've several newer Lie Nielsen planes acquired after Lie Nielsen stopped making O-1 cutters. I've tried very hard to fall in love with A-2 but it's just not working. There is another problem with Lie Nielsen planes, neither Hock or Vertias O-1 cutters will bed on Lie Nielsen frogs.

Lie Nielsen irons are 5/32" thick, Hock and Vertias are 1/8", you wouldn't think 1/32" would make that much difference but it does. The depth adjustment yoke goes too far into the cap iron and will not let the cutter seat on the frog, if you grind the cap iron so the yoke seats then the iron/cap iron are too thin for the leaver cap to tighten. Arghhh....

I've looked at the Clifton irons and while they are thiner than Lie Nielsen they are just thick enough to work. Once back from Mexico I'll order a couple to replace the A-2 cutters.

BTW, I received a couple of Japanese Blue Paper Stanley replacement irons last week. They are really nice, they come with very flat backs and will take an incredible  edge. It's a shame they will not bed on Lie Nielsen frogs either. They are so nice in the older, lighter Stanley planes the Lie Nielsens may get set aside if the Clifton cutters do not work out.

I'm looking forward to a few days of R&R with beer and tacos for breakfast and watching the critters swim their hearts out. See you guys on down the road,

ken

Friday, December 11, 2015

New Camera

My camera work has been on hold for a few years, mostly because of changing location, time, and limitations of the current camera. Before going digital I carried a Leica everywhere and used it to document my life.

I finally, I think, have found a Leica replacement in a FujiFlim X-Pro 1. It has been out for a few years, in fact one of the hold ups has been waiting for the replacement X-Pro 2 that has been rumored but never released. I figure its release date is now Jan 2016.

Anyway the new camera along with learning to use "Lightroom" should keep me entertained between projects and when not in the shop sharpening iron.

Shield any small children's eyes and make sure the critters can't see the monitor, here is the first image made with the new Fuji. Ugly Dude in front of a wall of tools:


Sweet Maggie Dog looking out for folks and critters walking in her gully:


Sam the Wonder Dog barking at critters in the gully:


And last, the gully the critters protect. Looking out to the Northwest and the Tucson Mt.:


As always....Click 'em to big 'em except for maybe the first one :-),

ken


Wednesday, December 09, 2015

Cross Post of "Beat a Dead Horse"

While the engineers and metallurgist hash out sharpening PM-V11 steel on a SMC thread, I've an observation on sharpening some other tool steels. I've always liked HC steels for working, mostly because they are easy to sharpen and will give a keen working edge that holds up reasonably well. Life is a trade off in most things, and working edges are one of those thing where if you improve one area some other area ends up in that well known basket. Because HC steel fits my "likes" and work flow I would guess 95% of my tools have HC steel cutters. There are a few exceptions and one is a cheap crank-neck WoodRiver chisel I picked up because I needed one to remove some glue and it was available. Turned out to be one of the most used chisels in the shop.

Anyway Bubba cut to the chase....

I've never paid much attention to sharpening the crank-neck because of its use, when it loaded up with "gunk" or wouldn't remove glue I'd hit it with a couple of the oil stones and go back to work.

When I'm, for whatever reason, trying to avoid being productive I sharpen iron. BTW, my hands have been "black" for the last couple of weeks .

Finally to the chase: I decided to give the crank-neck some love....Total rejection, it refused my advances. Started out on oil stones with a "green stuff" infused Horse's Butt strop working freehand. Sharp feeling and looking but I decided to break routine and test on some end grain, OK but a lot of effort to pare. A&B'ed with one of my HC chisels, no contest the crank-neck was dull. Humm, what to do?

Pulled out the Shapton Pro's and went through the full progression finishing up on a Gokumyo 20000. Same story....No joy it didn't improve. What the hey, maybe I've lost the freehand touch....where is the new Lie Nielsen honing jig, has to be somewhere. Flattened all the Shapton and the Gokumyo and went at it again using the jig, no difference. The blankety blank will not sharpen.

Bottom line, I've not a clue what steel is used in the chisel, but while it will get sharp enough to remove soft glue and other rough work around the shop it will not get to "working" sharp like a HC chisel such as a Japanese White Steel or a Western O-1.

I guess I'm in the market for a good crank-neck.

ken

Saturday, November 28, 2015

Black Friday

I wasn't going to run the streets on Black Friday but the call of Home Depot made me unlash from the mast and join the mad rush. Now what really happened: One of our pantries has double sliding doors that I've been fighting with from the get go of buying this house. Fix, rehang, three or four months later repeat. I'd finally reached my limit and in the middle of fixing I tore that sucker out.

So off to Home Depot for a new track and rollers. The woodstore is just a couple of blocks north of Home Depot and in the morning their coffee is fresh, why not. Walked in and headed to the coffee machine with Tom on my heels, that man knows my buttons. As I pored my coffee he mentioned that Jet clamps were half off and there were just a few left. Two cups of coffee and a little over $200 USD later I headed back to install the new track and rollers.

Because we had T-Day at friends yesterday MsBubba wanted a Turkey of her own. so I'm hanging door tracks, cooking a post Thanksgiving Thanksgiving meal (MsBubba is at work), playing kick the ball with Sweet Maggie Dog and a occasional game of Tug with Sam the Wonder Dog and doing tool maintenance. BTW, the day after Thanksgiving Thanksgiving meal was great.

I'm starting to get comfortable with the Takashima stone for my finishing stone. For now my sequence depending on the condition of the iron is: Set the bevel with either a 600 or a 1200 Atoma. Remove most of the diamond plate scratches and raise a small wire edge with a Washia then move on to the Jnats. Set up the Takashima finish stone with the Brick aka a Ikarashi. The slurry makes a big difference, it needs to be Goldilocks, not too much but also not too little.

I've had a set of Kikahiromaru #1 White Paper chisels for several months. When they first arrived I set up a couple or three as needed to work and the rest have been sitting until I could find some time to work on 'em. Time I found the last couple of days and I've been beavering away on the rest of the chisels.

Here is one of the Kikahiromaru's I just finished on the Jnats:


Click it to big it.

The bevel has a very fine matt finish with no heavy scratches. The edge when looked at with a 10X lope is pristine. It hasn't touched wood but from looking and feeling the edge I expect it is a good working sharp chisel and the edge will stay working sharp for a long time.

I've started down the Jnat slippery slope and ordered a couple more Jnats.  One I hope to use as a replacement for the Washita so I can go all water vs. the current start on oil and end with water. I like using oil better than water but I like using water better than half and half. I know me and brain farts. The other stone I'm hoping will fit in the sequence just after the Takashima, a little finer but not too much.

Damn it's nice to have a couple days off in a row, see you guys on down the road.

ken


Thursday, November 26, 2015

Thanksgiven

This has been a good day, MsBubba and I were both off and we were invited to a friend's house for T-Day dinner. For the first time in awhile we had time off together and no obligations other than to show up for food.

Amazing how much can be done when two are working together. We didn't attack any big projects but instead finished up the loose ends of many other projects. As an example, I had two corners and about two feet of base board and quarter round that has needed installing for several months. Done. Photo and art work needing re-hanging from the sitting room re-do of several months ago, also done. And of course any time MsBubba has some muscle available all the furniture must be moved from one room to another.

I even found a little time for tool maintenance and a hot tub soak while watching a Desert sunset.

Hope you'll had a good T-Day as well.

ken

PS: I'm slowly working my way through the prepping of the last set of Kikuhiromaru #1 White Paper chisels. I set the hoops and sharpened a couple when they were first received but most have just set in the rack. I had other chisels to use and little time or energy to set the Kikuhiromaru's up. Today I made it through most of the set, just a couple more to go and the whole set will be usable. BTW, these are like a lot of high end Japanese tools, you receive a Japanese chisel "kit" and it is up to you to set 'em up to suit your needs.

Wednesday, November 25, 2015

Japanese Chisels

There is a good thread over on SMC about the relative hardness and why Japanese steel can be sharper and hold an edge better vs. Western steel.

It's worth a look, so far it hasn't turned into a food fight.

http://www.sawmillcreek.org/showthread.php?237853-what-makes-japanese-chisel-steel-so-much-harder

ken

Tuesday, November 24, 2015

Another Sharpening Post

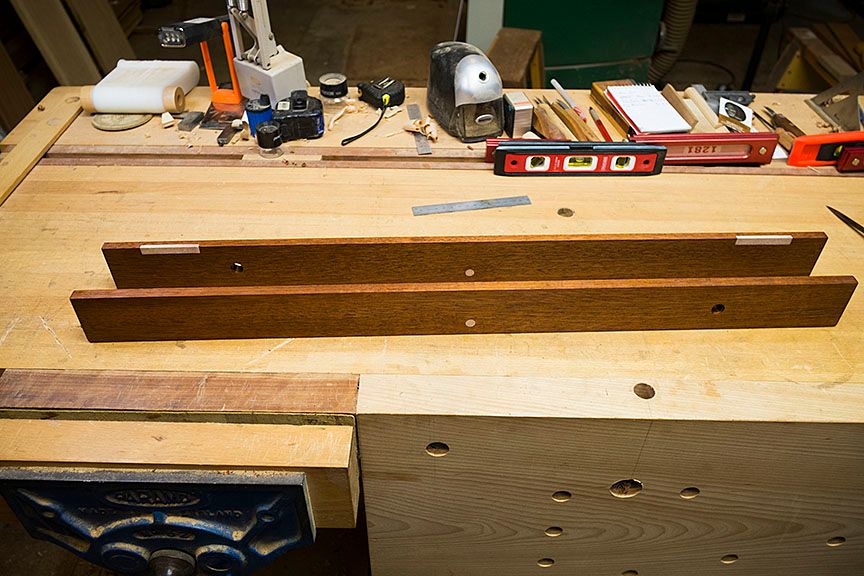
I'm in between projects, or maybe a better way to put it, I'm working up the energy to wrestle MsBubba's couch table's Sapele slab into submission. While waiting for inspiration, as usual, I've sharpened a bunch of iron. Western chisels and plane irons, Japanese chisels and plane irons, it has made no never mind, they have all felt the bite of my stones.

Most of the Western iron has been hollow ground on the CBN wheel. then the grind marks taken out on 600 and 1200 Atoma plates followed by setting up the Hard Black Ark with a Washita and polishing on a Horse's Butt strop with "green stuff". Other than the grinding it is very fast and gives a sharp, strong edge. If the iron is in good shape with a bevel that is not too steep, I will skip the CBN wheel and the 600 Atoma.

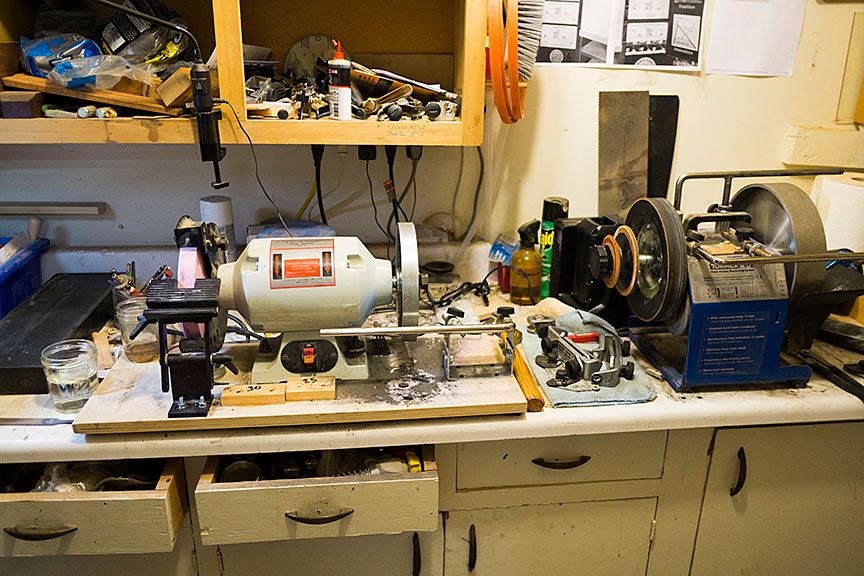
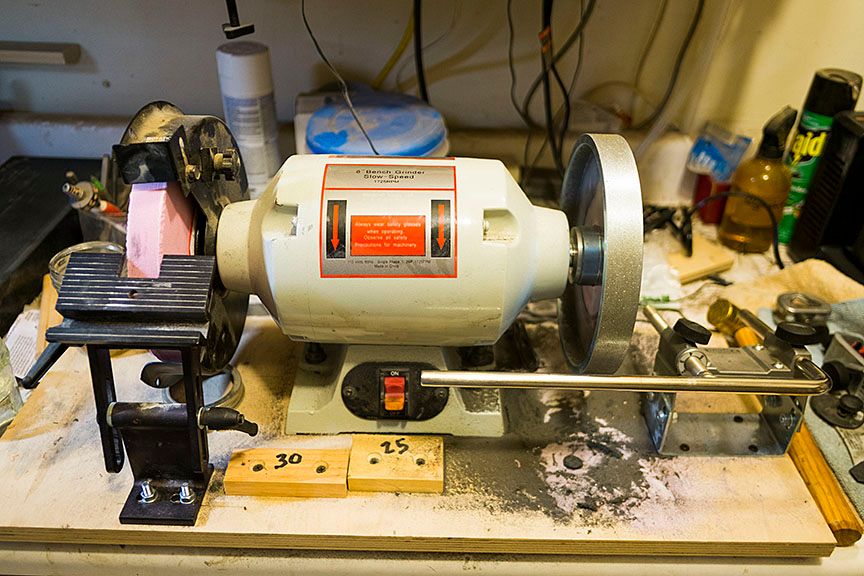
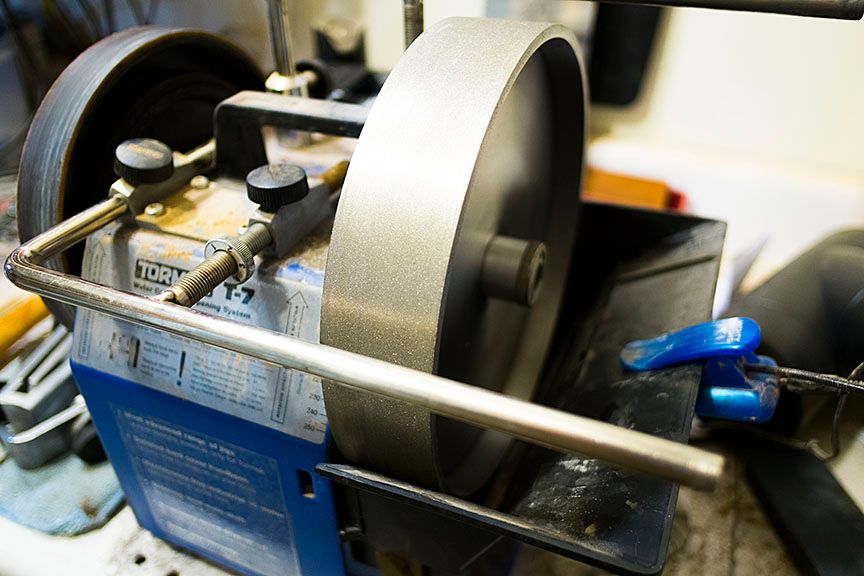
The grinding station with the CBN wheel:


There is a learning curve with the CBN wheel if you want a straight, square edge. The wheel is very aggressive and it is easy to make uneven and un-square grinds when using it, even when using the Tormek jig.

For the Japanese iron, both setting the bevel and honing/polishing is freehand. Depending on the condition of the iron I will set a flat bevel starting with either the 400 or 600 Atoma and on through the 1200. The honing setup stone is still the Washita followed by the medium Jnat and polished on the hard Jnat. The hard Jnat does a good job of polishing with no need to strop. To remove any wire edge that is left I will give it either a pull on an oiled strop or a pull through Oak end grain.


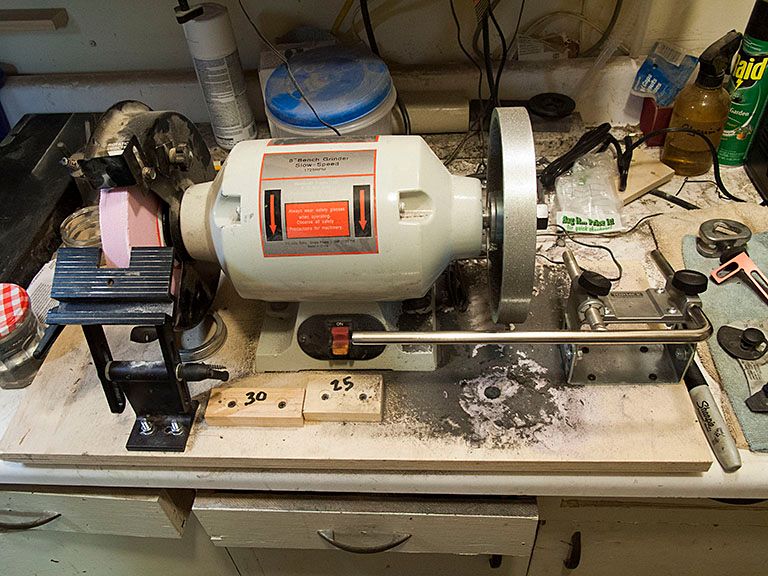
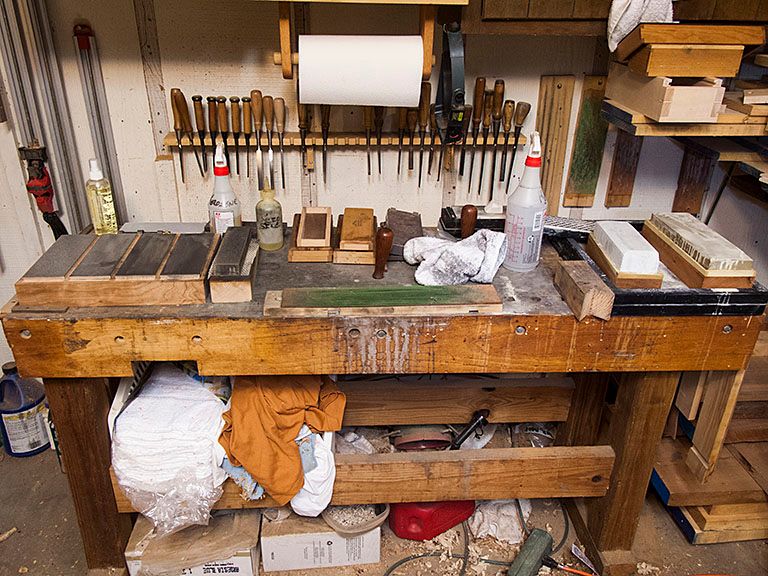
The bench is set up with diamond plates on the left, Atoma 120, 400, 600, and 1200. Next to the plate holder is the oil stone holder. For oil stones I have a soft Ark, a Washita, a Hard Black Ark, and a Translucent Ark available. The strop area is in the middle with a Oak block to the right. On the right end is the water stone pond with the Jnats. There are more stones stored in the cabinet above the bench, every thing from a 20000 Gukumyo to some 40 year old Kings with old diamond plates and more Shaptons of all grits thrown in.

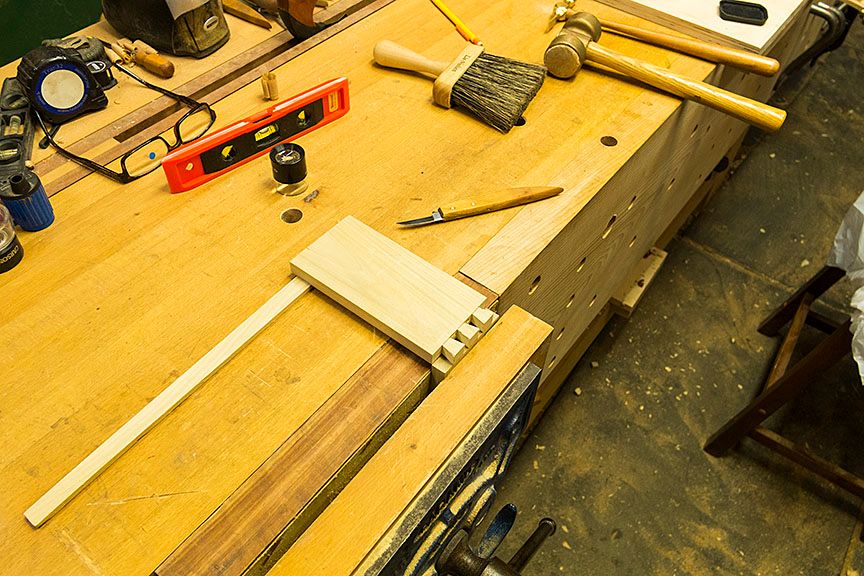
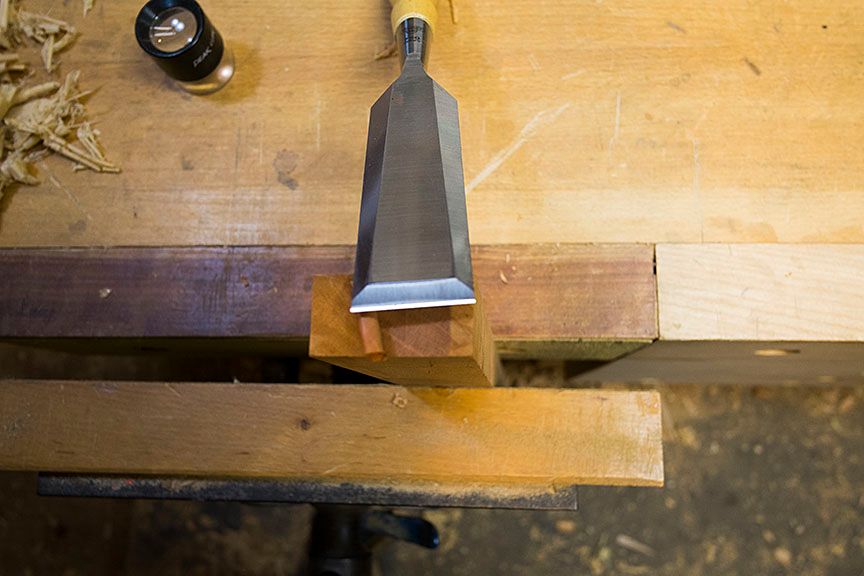
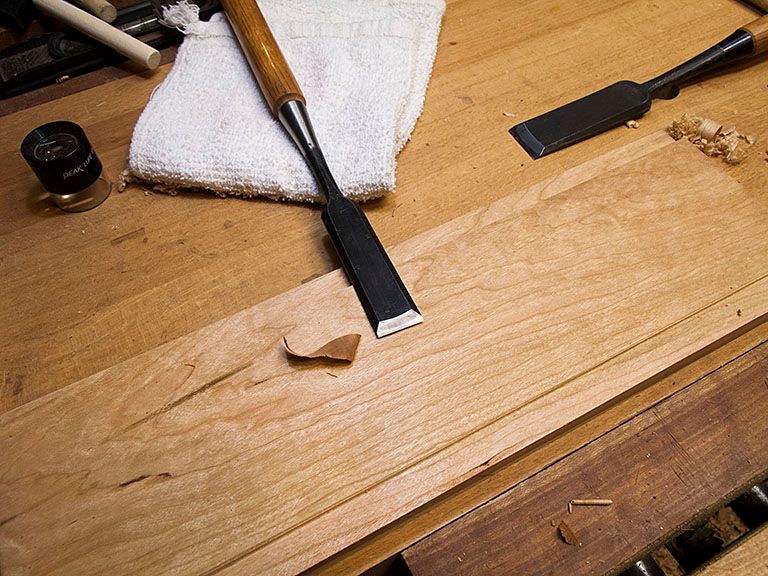
Here is a #2 White Paper Steel push chisel sharpened on the Jnats. One of the advantages of using Jnats other than a very sharp edge is an edge that lasts longer because of smaller groves left from the stone's grit. An aesthetic advantage with natural stones the Ha (steel) and the Ji (soft iron) will be differentiated.


You may be able to see the line between the Ha and the Ji in this photo, as always click 'em to big 'em.

ken


Thursday, November 19, 2015

Woodies

Never one to let work go to waste, I posted a thread over on SMC about my woodies, might as well put some of it on the blog.

I have three wood stock smoothers that I use and a number of shop made smoothers as well. I'll just post a photo of one of the shop made planes as they all look the same, the only difference between them is in length.

From top to bottom. PhillyPlane Small Coffin Smoother, ECE Horned Smoother, ECE Large Coffin Smoother with a double iron, and on the bottom a shop made double iron smoother:


That's a 140mm ruler to give some reference to size.

There are a couple of Japanese Smoothers in the till as well. They are still a work in progress. I can see great potential but I'm still on the lower part of the learning curve.


I also have an ECE Try Plane and a PhillyPlane Jack. While I usually use the machines to true and size lumber, when I do it by hand those two come out to play. There is a huge difference between flatting a board with a #5 and a #8 vs. starting with a ECE horned scrub, then on to the Philly Jack, and finally the ECE Try. The difference is between spending the next day in bed moaning about how sore you are or being ready for another go.


Remember to click 'em.

I have a couple of Try planes on order, a single iron from PhillyPlane and a double iron from Steve Voigt. Once they arrive I will retire the ECE Try.