In my case maybe the title should be "Night Job". I've had a run of "Initial" clients and Initials get the left over time slots. That normally means working the back side of the clock. No complaints. it is what it is, besides most of my life has been spent working different hours and days from what most folks think of as working hours.
Damn that was a tasty looking rabbit I chased down the trail, happens often...What I set down to post about was how easy the newer airplanes are to fly. As an example: The company I work for will sometimes donate an hour of Simulator time to charities for their fund raisers. Last Saturday the winner of the latest donation and his son showed up to claim his prize. Neither had ever flown in an airplane other that a few rides in steerage on an air carrier. I showed them how to adjust their seat, where the controls were and what they did and how to marry the aircraft symbol with the Flight Director. I explained the Auto-Throttles and gave a short explanation of what would happen on takeoff and what they needed to do.
We lined up, he pushed the Auto-Throttle engage button and away we went. We made a low pass over NYC, around the Statute of Liberty and back to KJFK for a landing. The son did about the same flight profile. Other than pushing a few mode select buttons I never touched the aircraft and they flew on both autopilot and by hand. If someone had been in the back they would have noticed nothing other than maybe a little more aircraft movement than normal while they were hand flying.
The newer aircraft are that easy to fly if everything is working, It's a big change from my early days in a J-3 with no instruments or radios or even from my first LearJet 23.
Thursday, October 31, 2013
Wednesday, October 30, 2013
Marking Gauges
I'm a sucker for marking gauges, mostly because it is hard to find one that works. Here is a family portrait of the ones I have near the work bench, probably another dozen or so stuck in nooks back in the tool room. I know....I'm a sick puppy with a major tool jones.

The ones I use the most are the first three on the left. What started this post is I just ordered three more of the one on the far left from Tools from Japan. It is not perfect, I guess I will have to make a shop made one to find the perfect marking gauge but it comes the closest to being right of any of the gauges I own. BTW, the Hamilton gauge in Osage Orange next to the Japanese screw locking gauge comes very close, for me it;s only down sides are the marking knife is very hard to sharpen because of its small size and shape and I can buy almost a half dozen of the Japanese oak gauges for the price of one Hamilton.
The ones I use the most are the first three on the left. What started this post is I just ordered three more of the one on the far left from Tools from Japan. It is not perfect, I guess I will have to make a shop made one to find the perfect marking gauge but it comes the closest to being right of any of the gauges I own. BTW, the Hamilton gauge in Osage Orange next to the Japanese screw locking gauge comes very close, for me it;s only down sides are the marking knife is very hard to sharpen because of its small size and shape and I can buy almost a half dozen of the Japanese oak gauges for the price of one Hamilton.
Tuesday, October 29, 2013
Lapping Iron
I've tried most sharpening "systems" at one time or another and still have most of 'em stored someplace in the shop. All will get you to what I call "working sharp", some make a bigger mess, some cost more, some less, some are more hassle than others. I love the feel of good steel on a hard black or translucent Arkansas oil stone, diamond stones not so much, but my system of today is diamond stones.
The biggest problem with diamond stones is getting a final polish, like Arkansas oil stones the iron comes off the final stone sharp but not polished and requires either stropping or lapping to finish. For years I've used a hard leather strop charged with Herb's Yellowstone to finish the edge and backs of plane irons and chisels.
I'm beginning to change my mind on the value of the stropping step, while the iron still needs a polishing step I can't escape the feeling that stropping on leather no matter how careful you strop is more likely to dub the edge than not.
Currently I'm trying lapping on MDF charged with diamond paste, the first results are encouraging. I also have a Mike Stein style MDF lapping plate cooking* but it is still almost a month before it will be
usable. More to follow.
*Soak MDF in Danish oil for 24 hours then let it dry for a month before sanding flat and smooth.
Monday, October 28, 2013
Work Bench
Right next to the sharpening bench is my work bench. It's made of SYP imported from Texas, I used just under 400 BF of construction grade 2X12s. My guess is when completed it weighted about 400 lbs, having been in Arizona for over a year I'm sure it is under 400 now. Whatever, it does not move. The hardware is Benchcrafted with a leg vise on the left and a wagon vise on the right. I looked for wind and hollows or bellies the other day and it is still very flat.
There is not much I would change if I were building today. I have a 10.5" Paramo quick release vise made back in the 70s that I might use instead of the leg vise, it holds a little better than the leg vise but not enough to retrofit, or I might just stick with the leg vise. I would use round dogs instead of square, nothing wrong with the square ones, just no real advantage for the square dogs vs. 3/4 round ones and round make an easier build. I doubt I would install any end vise, wagon or otherwise. I knew going in on this build I seldom used an end vise but I thought maybe if it was a wagon vise I might use it more. It doesn't happen, nothing wrong with the wagon vise I just have work habits where I use other ways to hold my work that work for me. The Benchcrafted wagon vise is a fairly easy install compared to other end vises but nothing is a lot easier and I don't think I would miss having an end vise.
Odds are I would use SYP, this is my fourth SYP work bench build and they have all worked well. Having said that, maple would sure make a pretty bench and if I were to build another it would be because I just wanted to build a bench not because I needed one. This bench does every thing I need it to do and does it without compromise. If I did build another, one would have to go. There is not room for two just under 3 meter benches in my small shop and I'm not sure I could work on a maple bench like I do on the SYP one. When I spill something or nick it I know it is just a work bench, a maple one maybe not.
Sunday, October 27, 2013
Sharpening Bench
Several months ago I moved the sharpening station out of the tool room (aka Fibber Mcgee's Closet) out to a old work bench next to my current work bench. It was a good move, it is at a better working height and is just a step away from the working end of my main bench. As always I could use a little more room but what's new. I still have the wet and the dry grinders in the tool room if needed, most of the time I will just use the DMT extra extra course and one of the honing jigs to reestablish the bevel so the grinders do not get much use.
I would guess 70% of my sharpening is free hand, when I feel a iron getting too dull for the job a quick step over to the diamond stones and I'm back to work. The other 30% is like I've been doing for the last couple of days where I'm reestablishing the primary bevel, for that I will use either an Eclipse or Mark II honing guide depending on the iron.
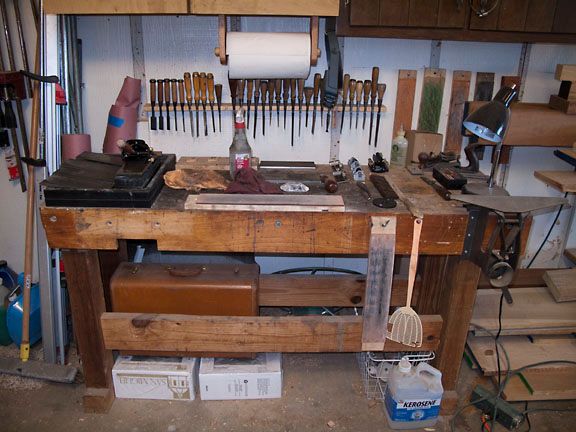
I would guess 70% of my sharpening is free hand, when I feel a iron getting too dull for the job a quick step over to the diamond stones and I'm back to work. The other 30% is like I've been doing for the last couple of days where I'm reestablishing the primary bevel, for that I will use either an Eclipse or Mark II honing guide depending on the iron.
BTW, that is the new shop paper towel holder over the bench. On the left is a Shapton glass pond and stone holder, it makes a really nice stone holder even for the DMT diamond stones. On the right is Tools for Working Wood saw vise and in the center is a strop with Herb's Yellowstone dressing. I've used a leather strop for years but I may be changing methods soon. I'm testing oiled MDF with diamond paste, more info as I see what works the best.
Saturday, October 26, 2013
Table Saw
As I have posted before, when I semi-retired and gathered my tools my plans were to have a mostly hand tool shop, still have a jointer, planer, and band saw to do the grunt work but no table saw, no electric router or other joint making machines. Shortly after retrieving the saws, planes, chisels and other tools from storage MsOK wanted to redo the kitchen and in a moment of insanity I volunteered. That allowing myself to speak before thinking through what I was saying meant ending up with a table saw, routers, router table and other noise and dust makers.
The router table and some of the routers are gone as are some of the jigs and other appliances needed to complete the kitchen in this life time. Over the last year the table saw keeps losing space, it has gone from the center of the shop to off to one side to now stuck in a corner. It is still usable for small rips or crosscuts but it is not getting much use and even in the corner it takes up space that could be put to better use. Kinda a long way around to I have a, can't say love because I've never loved a table saw but maybe a like/hate relationship with it. I go back and forth, sell, keep, sell, keep. I expect I will keep it for no other reason than it isn't worth much and it would take a chunk of change to buy another if I needed one for a project. Sure would like that space though.
BTW, about once a year I take a rough board and four square it with hand tools just to remind myself the band saw, jointer and planer earn their floor space. Wish I could say the same for the table saw.
Osage Orange
Picked up a nice chunk of Osage Orange this AM, from the looks of it I may be able to get 3 or 4 planes out of the mostly quarter sawn area. I'll cut the blanks once I'm back from running the streets.
Here's the final paper towel holder. Three hour job, three days to finish :-).

Here's the final paper towel holder. Three hour job, three days to finish :-).
Paper Towel Rack Part II
Just because the first paper towel rack is now a shop appliance doesn't mean MsOK has given up on a under counter paper towel holder. So back to the shop. Digging around in the scrap pile I found a cherry cutoff with beautiful figure and just long enough...Not a mm to spare, if I changed from housed dados to dovetails.
Not a problem, chopping housed dados in oak vs. cutting dovetails in cherry, a really hard decision. I thought about doing half blind for about two seconds because the next project will have four sets of half blind and it has been a month or so from the last set of half blind I did for the bathroom wall cabinet. Sanity prevailed. Bottom line, MsOK has a smallish paper towel holder made from a beautiful piece of figured cherry, through dovetailed with a walnut rod to hold the paper towels. Photo to follow once the finish is done.
As with most projects around Casa Chaos, what should have been 3 to 4 hours tops, took the better part of three days and I still do not have it signed off by the Chief Inspector.
Friday, October 25, 2013
Bad Ducts
My biggest chip producer is at the end of the dust collection duct work, wasn't planned that way because it wasn't planned. It just grew topsie turvey as machines were added or changed and the shop is so small there is not much chance to make it right. Long way around to; as I dimensioned the Sapele for the little display case this morning the planer started spitting chips back at me. It's a pretty good sign the dust collection system isn't working and sure enough it was totally plugged. I started removing duct work until I could find some suction, the good news is there was pretty good suction just before the jointer "Y" which is the next machine over from the planer. As expected there was a hole in the jointer's duct. While I'm working on the system I'm going to reinstall the blast gates at each machine....A PITA to keep up with opening and closing but I expect it will be worthwhile with the planer now at the end of the line.
Used the New Plane
Used the new 230mm plane for the first time in anger this AM on MsOK's paper towel rack to fit, chamfer, and smooth the rack before putting on the finish. Damn nice, could work both pull and push, one hand or two, all that and there is nothing that sounds as good or feels as good as a wood plane on wood.
This is one sweet plane, it's so nice I may have to make another one, or two, or three.
This is one sweet plane, it's so nice I may have to make another one, or two, or three.
Thursday, October 24, 2013
Paper Towel Rack
Last night as we were finishing dinner MsOK said: "I want an under counter towel holder". My first question was why? The one we have has served us well for at least 10 years and besides I like it. Piddle, it takes up too much room, so once SWMBO speaks the world moves. I found a small piece of red oak that would work, chopped a couple of housed dados, cut some steps and drilled a couple of holes. The new paper towel rack is in the clamps, I'll rub a couple or three coats of Tried&True on it tomorrow, hold it up so MsOK can see how it will fit and I will bet I'll have a new paper towel rack for the shop.

Wednesday, October 23, 2013
Tails Man
Not a clue why other than the folks I've watched cut dovetails have all cut the tails first so I've almost always cut the tails first. Tonight I was cutting some warm up dovetails and decided to cut a set pins first. In some ways marking is easier and I like being able to use a pencil to mark the second cut, gives an easier line to follow. Not saying I will change but I will play with 'em for awhile....It is good to reevaluate how you do things occasionally instead of just "because".
Tool Porn
I opened the mouth just a hair more and rubbed it and the wedge with Tried&True and let it sit for a couple of hours. Wiped it down with a dry rag and went back to the scrap cherry, This is a good one.

The stock is Babinga 230mmX60mmX45mm with a 44mm Hock iron and chip breaker.
Tuesday, October 22, 2013
Shop Made Planes
My guess is I've made twenty or so Krenov style wooden planes over the last year....most didn't work as well as I would like. I guess I'm a slow learner but I do not give up easily, over the last month each planes has been better than the last. My last one is about 220mm with a 31mm iron and is sweet. It is the second from the left, the others were made last month and are also very good planes.

They, the planes, are easy to make. A couple or three hours plus the time for the glue to set and you have a very nice plane. I do the rough dimensioning with power tools, the finishing including cutting the mortice for the chip breaker screw by hand.
I think I've figured it out, I've one cooking as I type. It will be in the 230mm range with a 44mm iron and made of Bubinga like the four in the photo....more tomorrow once the metal hits the wood.
Cut Lumber for Small Display Case.
I cut some Sapele to rough length and thickness today for a small display box. It needs to sit for a couple of days to get its stupid wood tricks done and finished. I've had it in the shop for most of a year so a couple of days should be enough.
I noticed my push sticks needed replacement so I laid out a couple on some wide poplar.

Rough cut 'em and drilled some holes for the jig saw.
Used the jig saw to rough in the tote and then filed and sanded.


I noticed my push sticks needed replacement so I laid out a couple on some wide poplar.
Rough cut 'em and drilled some holes for the jig saw.
Used the jig saw to rough in the tote and then filed and sanded.
A rub with "Tried & True" and they are ready for use.
New Bench
I've been working on the new SYP workbench for awhile now, making small mods as needed but the basic bench is near perfect.

Subscribe to:
Posts (Atom)